Taken directly from Lasse Henning’s tutorial on his site, “The Model Shop”, here is what Lasse has to say…
Vacuum-Forming
The Star Wars modelers’ best tool – and yes, it sucks!The definition of vacuum-forming is: creating rounded plastic shells by heating plastic sheet materials until they soften and then “vacuum-sucking” them over pre-made plugs with the desired shape.
The ability to vacuum-form plastic materials is both a fun and liberating modeling technique. What you will learn here is how to make you own vacuum-forming device based on using the domestic oven and vacuum cleaner. It won’t be of an industrial standard but it works. Sounds like mumbo jumbo? The results will surprise you! You will also learn how to make the vacuum plugs. Once you master this technique the sky is the limit!
A) Making the vacuum-forming device
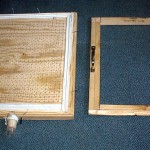
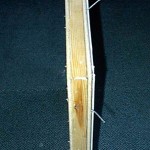
The vacuum-forming device is fairly simple to make. It consists of two parts: A wooden box with a coupling for the vacuum cleaner and hundreds of small holes in the top and a wooden frame for the plastic sheet that fits inside the domestic oven. (Make sure the size of the frame is based on the inner measurements of your oven).
1. The box should be made from plywood. Make sure the seams are airtight (use enough glue to fill any
cracks). The coupling for the vacuum cleaner should be made from a piece of tube (acrylic or steel) that fit exactly inside the cleaner’s tube. Use epoxy glue to make an airtight seal between the box and the tube. The top plate of the box must be perforated with tiny holes, the more the better. Leave a hole-free inch around the edges where you place some self-adhesive rubber band. This is to secure an airtight seal between the box and the frame.
2. The frame should be made from durable wood. It should be as large as the inner measurements of the
oven. Fit the frame with a couple of handles. This will make it easier to handle when it’s hot.
Click the thumbnails for some pictures of my vacuum-forming device.
B) Making the plugs
The plugs around which you are going to vacuum-form heated plastic must be made from materials that can withstand the heat. Carving it from styrene foam would not be a good idea, since the heat would collapse it into a shrunken pulp. The plug can be carved from a block of wood or from urethane foam. You could construct it by using styrene ribs, filling it with plastic scrap materials and coat it with epoxy putty and sand it into shape. This is labor intensive, but works well when you don’t have a large lathe. Be sure not to make your plugs too advanced. It is not possible to vacuum-form shapes more than 180 o. It must be possible to remove the plug without cutting the plastic. If the shape is too difficult to form over one plug, try to segment it into two or three plugs. To ensure a good vacuum-formed result you should cut a sheet of 10-mm plywood as a base to fit the underside of the plug. The reason for this will be evident when you start vacuum-forming. It leaves you a clean edge for cutting.
C) Vacuum-forming:
The procedure is as follows:
1. Cut a sheet of styrene. It should be between 0.5 and 2mm thick. Use double-sided adhesive tape and a stapler to fasten it to the wooden frame.
2. Prepare the vacuum box and hook it up to the vacuum cleaner.
3. Place the vacuum plug and its plywood base centered on the perforated top of the box.
4. Set the oven at 175°C / 380°F.
5. When the oven has reached the desired temperature, place the frame with the plastic sheet in the middle of the oven and close the door.
6. Watch the “softening” process closely. It should take 1–1.5 minutes, depending on how thick the plastic is. At first the plastic will start to sag down, only to flatten out again. Then it starts to sag a second time, and now is the critical moment. When the plastic is hanging like a worn out hammock it is ready. Only experience allows you to perfect the timing, but be careful not to leave the plastic in the oven for too long, it could melt and make a mess.
7. This sequence should be performed in a matter of a few seconds, as one quick fluid motion. Take the frame with the heated plastic out of the oven and quickly press it down over the vacuum plug on top of the vacuum box. Be sure the frame is aligned with, and pressed tight to the rubber band along the edges of the box. Then turn the vacuum cleaner on full power with your foot (the more powerful the vacuum cleaner is the better). The plastic is sucked tight around the plug. Leave the vacuum on for about 30 seconds before turning it off.
8. When the plastic has cooled you can remove the wooden frame (be sure not to cut your hands on the staples as I often do, it really hurts). Also remove the plywood base of the plug. Now cut the plastic shell along the underside of the plug with a sharp knife. I recommend a carpet knife with a wide blade instead of a scalpel. Be aware that plastic has no fibers and that your knife could take some surprising directions, you should cut slowly and steady. It could be wise to make a rough cut first and then trim it down.
9. If the rounded plastic shape of the model has plating you can vacuum form another shell over the first one. From this second shell you can cut plates and details that will fit exactly over the rounded shape. Just repeat steps 5–8.
10. When you have successfully removed all excess material you can remove the plug. The plastic shell can now be cut, sanded and mounted.
To contact Lasse Henning about his services, please click the banner link below…


