
This is absolutely fantastic! Some great info of this amazing build, as well as a tidbit of the original ILM built T.I.E. Fighter’s actual color!! Thank you Bill, and your crew, for your continued excellence in this art form. Stunning work!
See photos toward the bottom of this great article from Bill.
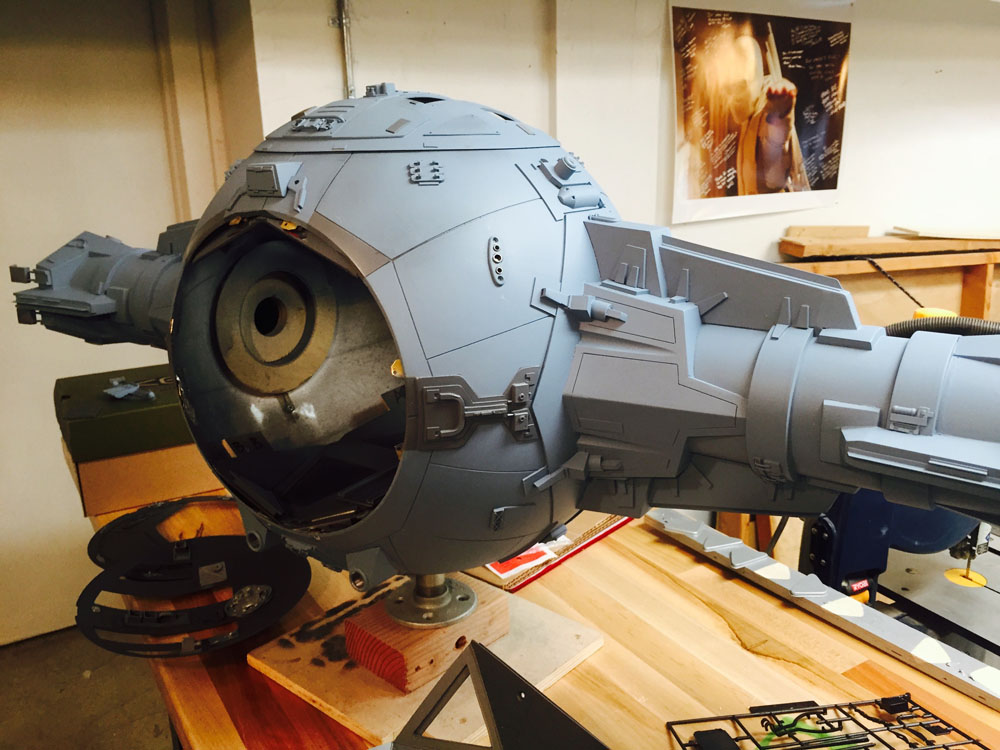
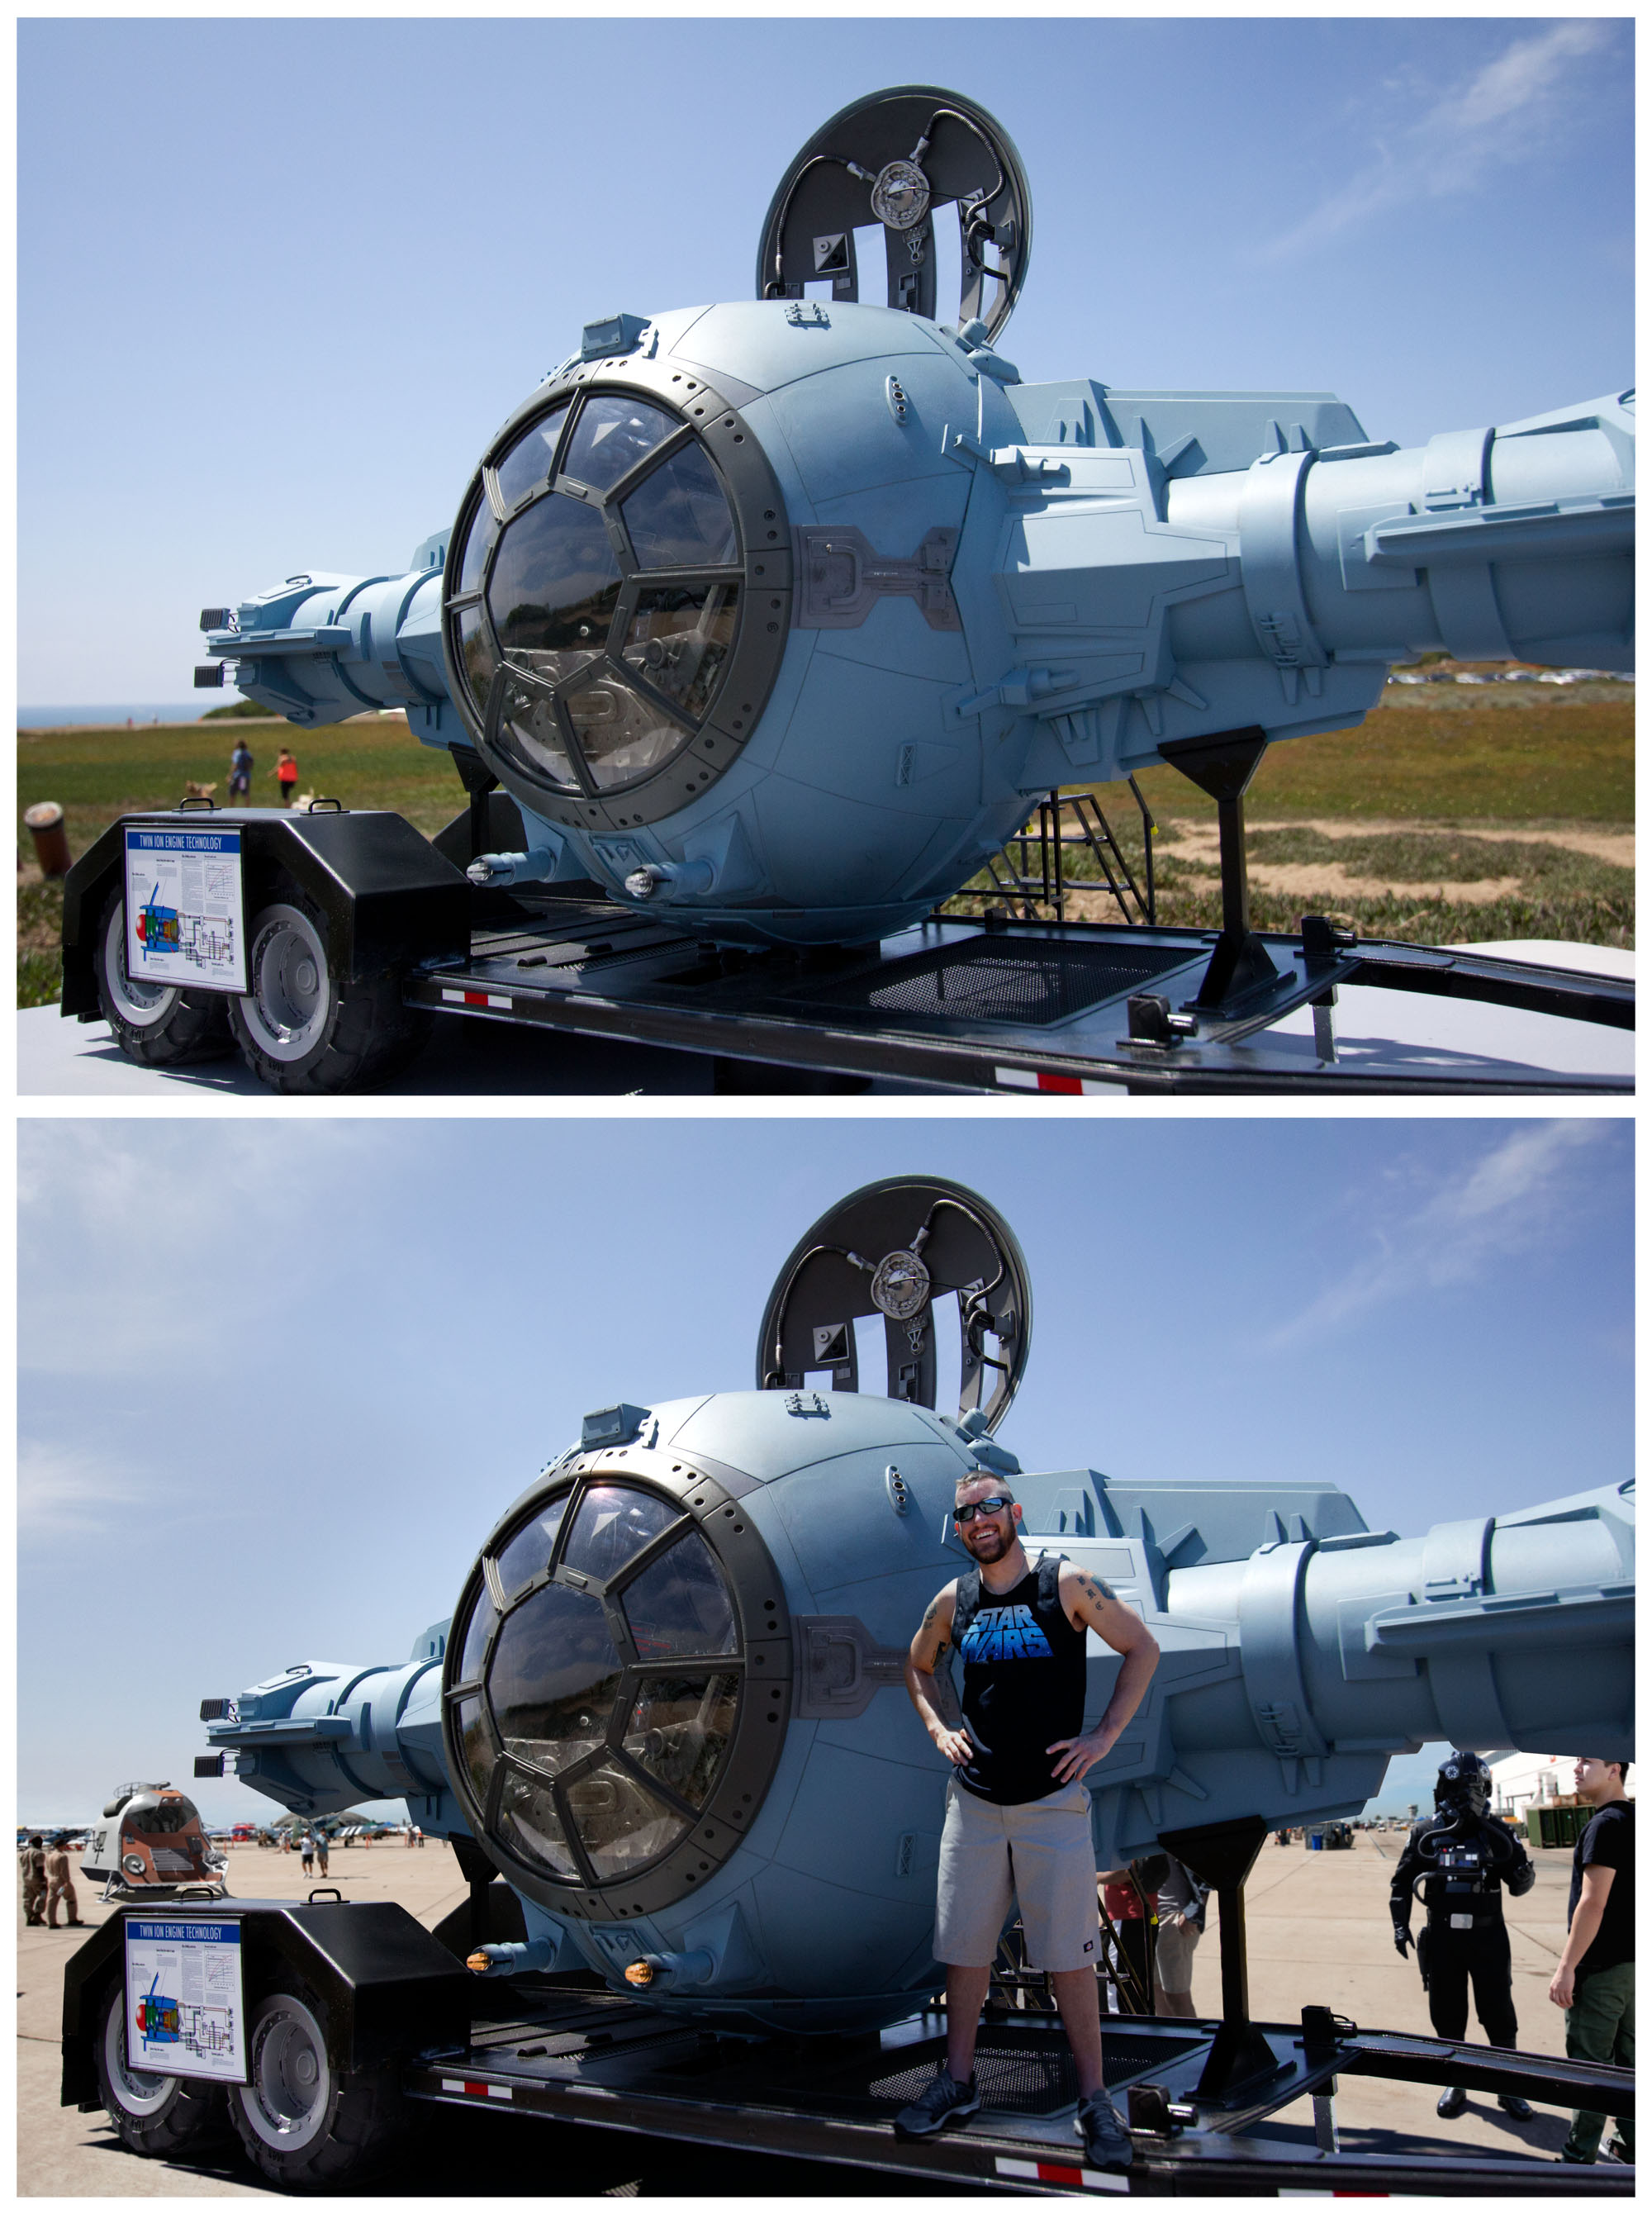
When I first started the Sci-Fi Air Show project back in 2009, I spent some time going to various air shows and photographing background images. I also went to observe the whole air show “world” in the hopes of creating a similar one for my air show. One of the displays I saw was an F-18 cockpit that had been cut off right in front of the wings and had been mounted on a trailer. The great thing about this truncated cockpit is that you were allowed to climb up inside it and get your picture taken. This was the inspiration for my T.I.E. Fighter Cockpit model. One of my goals was to show the relationship between the interior and the exterior of the ship and I thought this would be the best way to showcase this. I have castings from the the pyro molds of the T.I.E. Fighter model from Return of the Jedi that were my main reference material to work from. I photographed these (funky) castings and then cleaned them up as line drawings. I ended up using a 16 diameter acrylic sphere for the main body of the cockpit that I found on-line. It was a little over 3 times the size of the original studio model. It also placed the model at around 1/6th scale based on the size of the set interior. My plan was to use a dremel with a router bit mounted to a compass rig to cut the holes in the sphere so I first needed to calculate the center points for each of these holes. But before I cut the holes in the dome, I used a circular ring of thin styrene to create a dam and poured plaster onto the surface of the sphere to make a vac-u-form mold. This mold was used to create the thin cladding on the main fuselage and also the thicker plates for the hatch covers. The first structures I added to the sphere were the two tubes that form the wing supports. When attaching them to the sphere, I used a metal rod that went all the way through the tubes to keep them true. Once they were solidly attached, this rod was removed. As I started the process of plating the sphere and attaching the geometric supports on the wing tubes, I used a laser level to keep all the details in their correct alignment. There were very few kit pieces used in the construction of this model as the details and shapes that make it up are very specific. The studio blueprints for the interior only showed the basic geometric shape of it and how many of the sections were “wild” to be taken apart to allow for different camera positions. It was basically the “shell” of the interior geometry but had no information on the many details that were attached to it. One very valuable piece of information that the blueprints provided was the size of the interior. For fantasy ships like this one, establishing scale is always a challenge. The widest part of the interior set was 7 feet 6 inches and so I set the scale of this model as the exterior sphere being 8 feet. (It’s very spacious for a cockpit!) This allowed me to calculate the size of a human figure and also gave me a base for the details on the trailer. There are a few wide shots of the set available that show how it looked in the film, but as is always the case, I had to speculate on certain areas of the interior and also had to make changes to reconcile the interior to the exterior. There was no reference at all that I could find of the floor so I made that detail up using the design of the rest of the interior as a guide. The pilot chair was another mystery. There is a small amount of it you can see poking up into frame in a shot from the film looking over Vader’s shoulder but little else I could find. For inspiration of what the chair might look like, I found a shot in Episode 4 where one of the Death Star gunners falls off of his chair and you see that it is perforated metal, like a tractor seat. Building the interior was very fun but also a huge challenge as it was like building the classic “ship in a bottle”. The interior was built in 4 sections that had to break apart and be carefully maneuvered through the main viewport hole. It ended up being quite a puzzle to get in and out. Another issue that needs to be dealt with on many of these projects is the differences between the miniature versions of the ships and the full sized sets. On the model, the main windows have the mullions running through the center, top to bottom, but on the set the mullions are rotated so the window is in the center. There is a very distinctive triangular detail on the center mullion of the model that is not in the set. Another discrepancy is the panel/detailing directly behind the window seen on the model. For all of these details I went with what was seen on the miniature. The original T.I.E. (so named by the V.F.X. crew because they looked like a bow tie) ships had a very simple paint job with a few variations in panel colors and little to no aging. Their base color was right out of the can Pactra “Stormy Sea”. Sadly this paint is no longer available. In the shots seen in the film the TIE ships appear grey or white but the actual studio models were very blue. After “The Empire Strikes Back” the ILM model shop made a number of small TIE fighter models to give away as gifts. They were not used in the film but they WERE painted with Stormy Sea. Luckily for me one of these models is in our main lobby. I grabbed a bunch of paint sample colors from my local hardware store and compared them to the color on the model. The color looked to be somewhere between two of the swatches. I took that info to the hardware store and they mixed a special formula that was between the two. I’m not sure what it is about this color but it can change drastically depending on the lighting environment it is in. The aging on the model was very minimal, mostly graphite, some thin washes and a bit of airbrushing on the gription claws. The graphite aging was done by rubbing a soft pencil on fine sandpaper and lightly applying the resulting dust with my finger to the model.
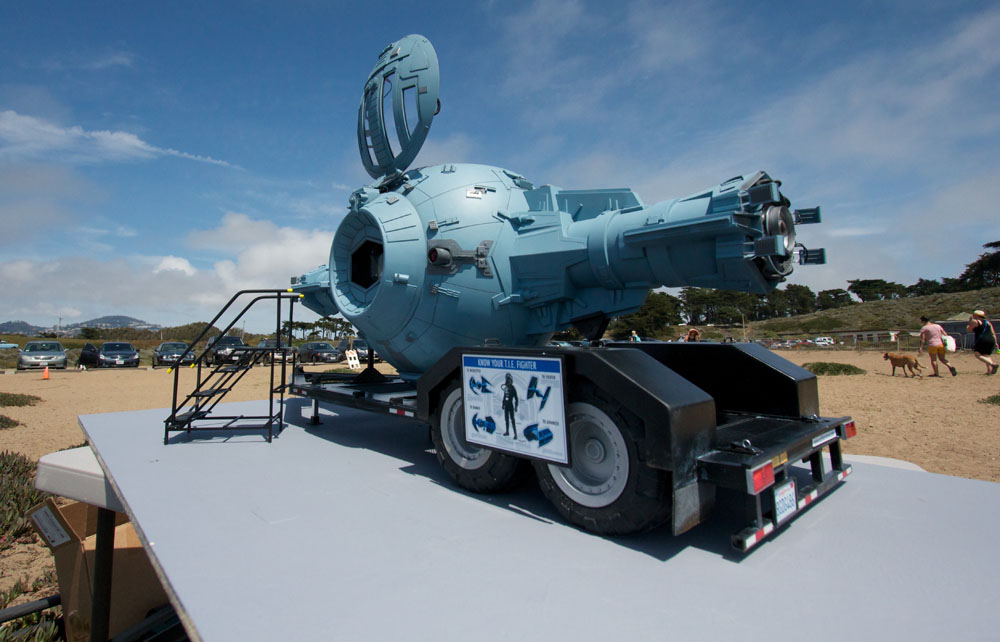
For the trailer, I went on line and found a number of reference images of trailers that I used to create one tailored specifically for the T.I.E. Fighter Cockpit. The great thing about the trailer and the stairs leading up to the rear hatch is that they give the viewer a very recognizable reference for scale. Tires, license plates and taillights bring real-world details to the model. As with most of my images the T.I.E. Fighter Cockpit was shot outside in natural sunlight. I have a piece of plywood painted grey that the model rests on that gives me shadow elements that I can extract later. After the photo shoot of the model, I go through and select the shots that I think are the best of the model or the ones that best illustrate its “story”. I then search through the many background images I have collected over the years to find one that has the correct lighting and perspective to match, and will use photoshop to replace the original background.. What follows is a number of smaller shoots with friends or co-workers who stand in for the people at the air show. I met a guy at a Hobby convention in Santa Rosa who has a beautiful T.I.E. Fighter Pilot costume and he agreed to be my pilot at the air show.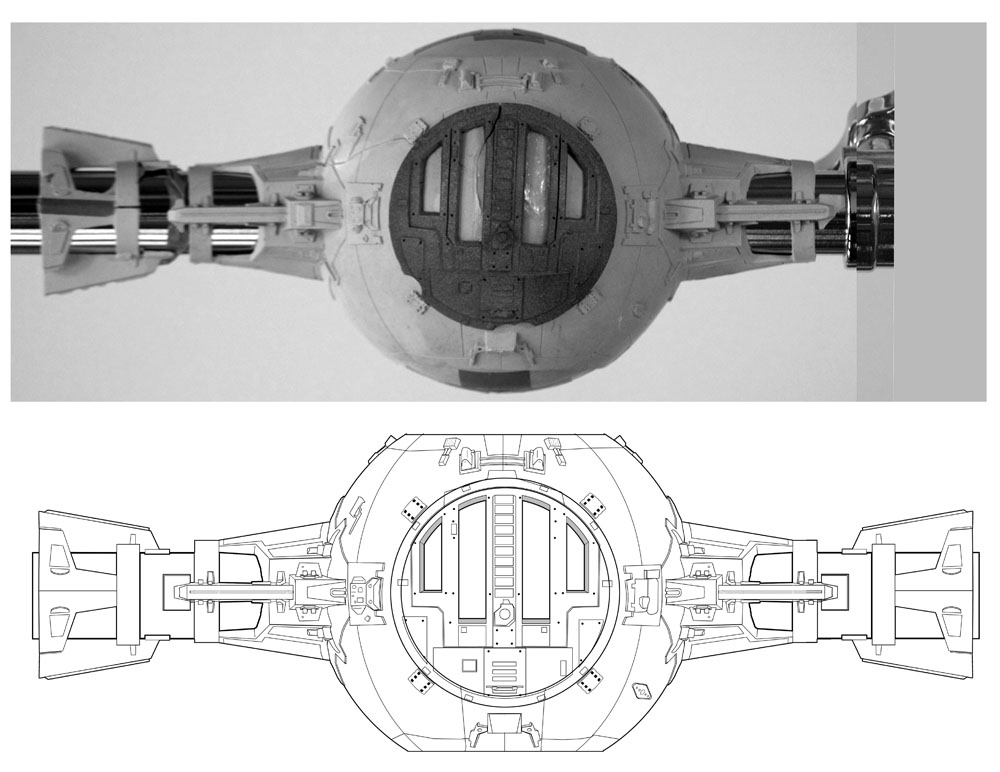
A photo of the original castings and the line drawing that was created using the image.

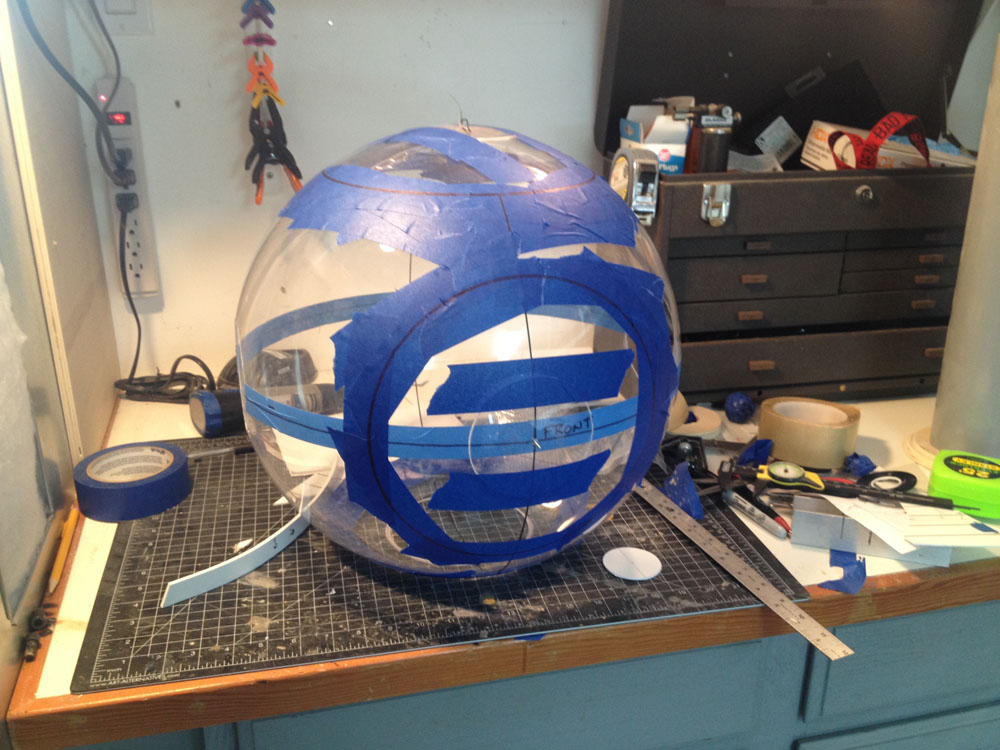
Laying in the centerlines on the sphere. To the right is a casting from the original pyro molds.
Setting the center points for cutting the openings.
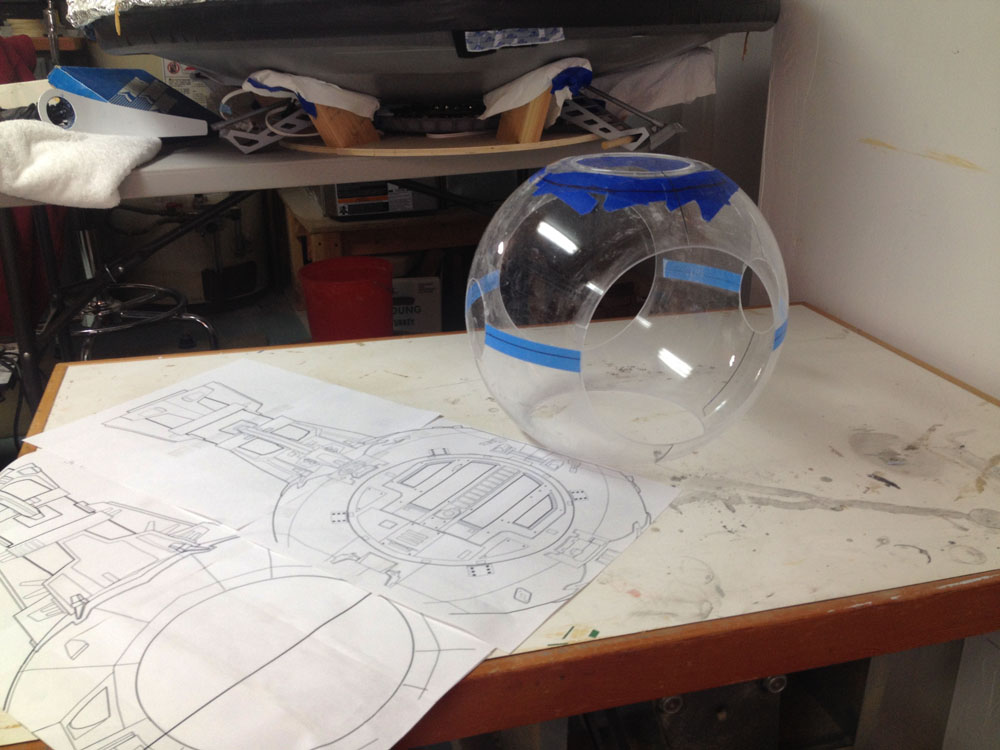
The sphere with the openings cut out.
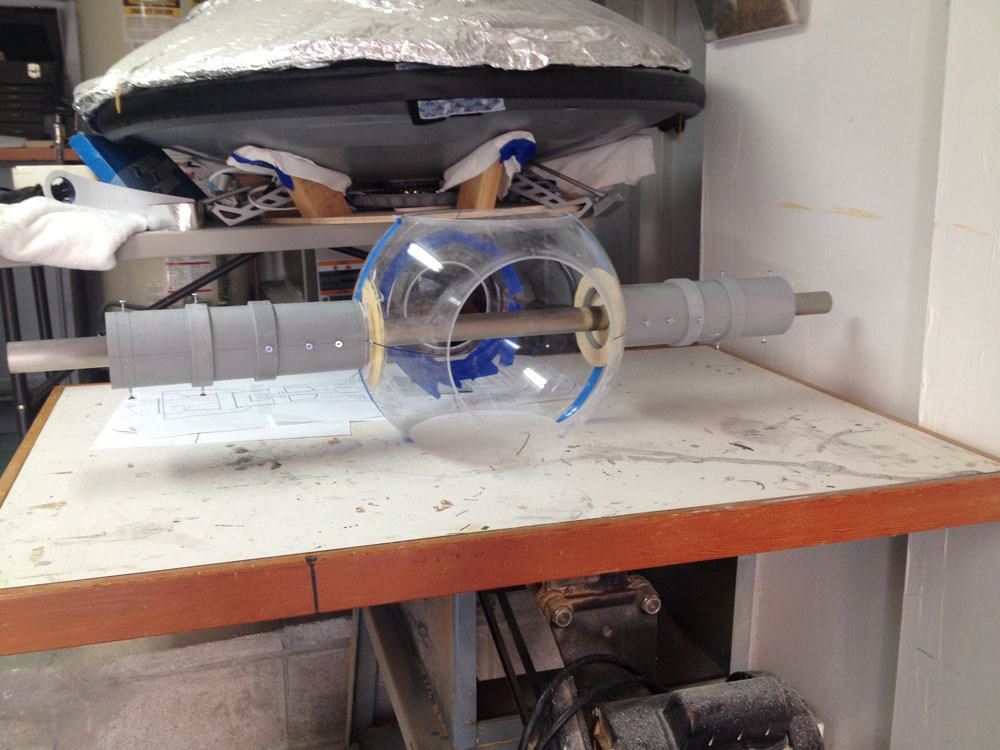
Attachment of the wing supports.
Using a laser level to verify alignment.

The wing support tubes were constructed using telescoping E.M.A. tubes.
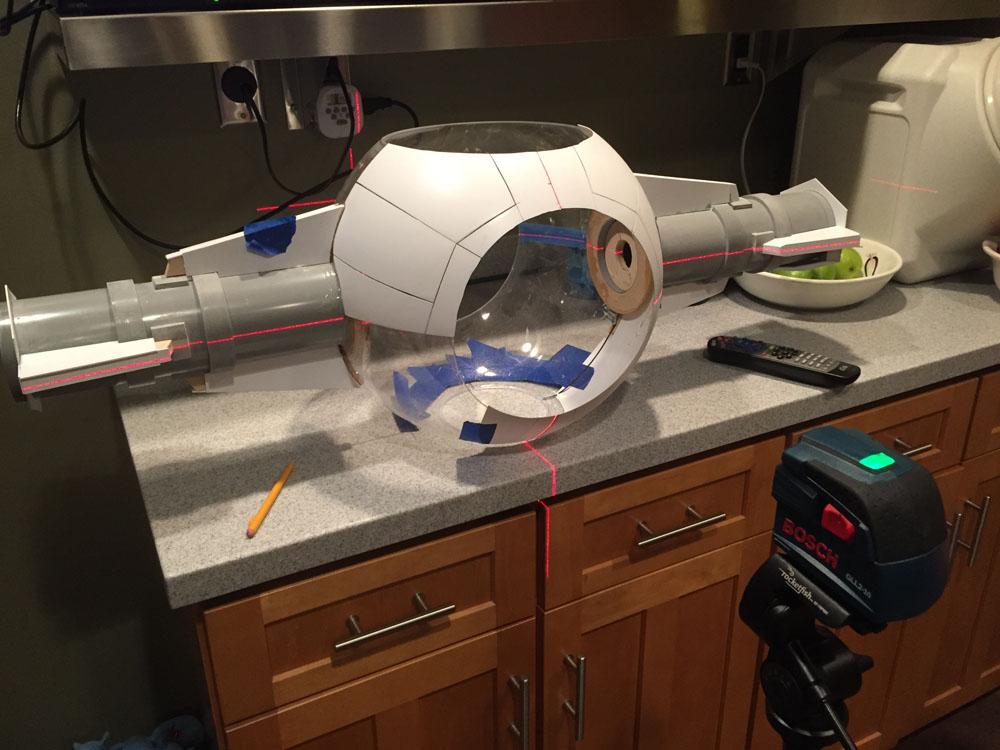
The vac-u-formed plates are used to detail the exterior.
Constructing the window frame.
Detailing continues on the bottom.
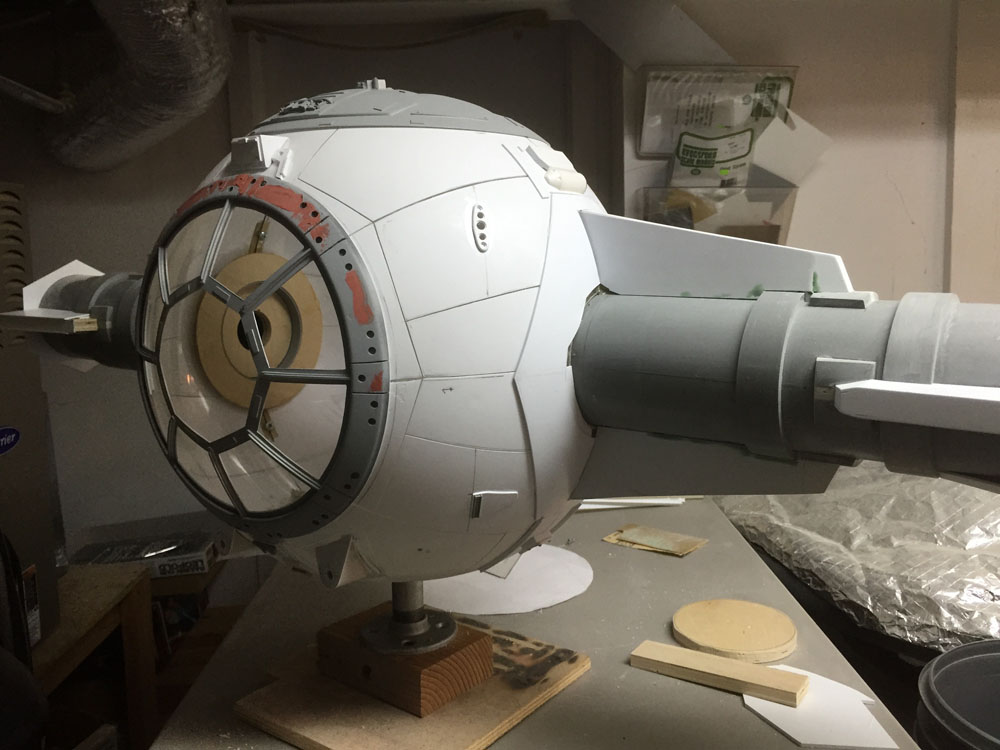
The opening at the front was the largest diameters so that was the area where the interior sections would be fed.
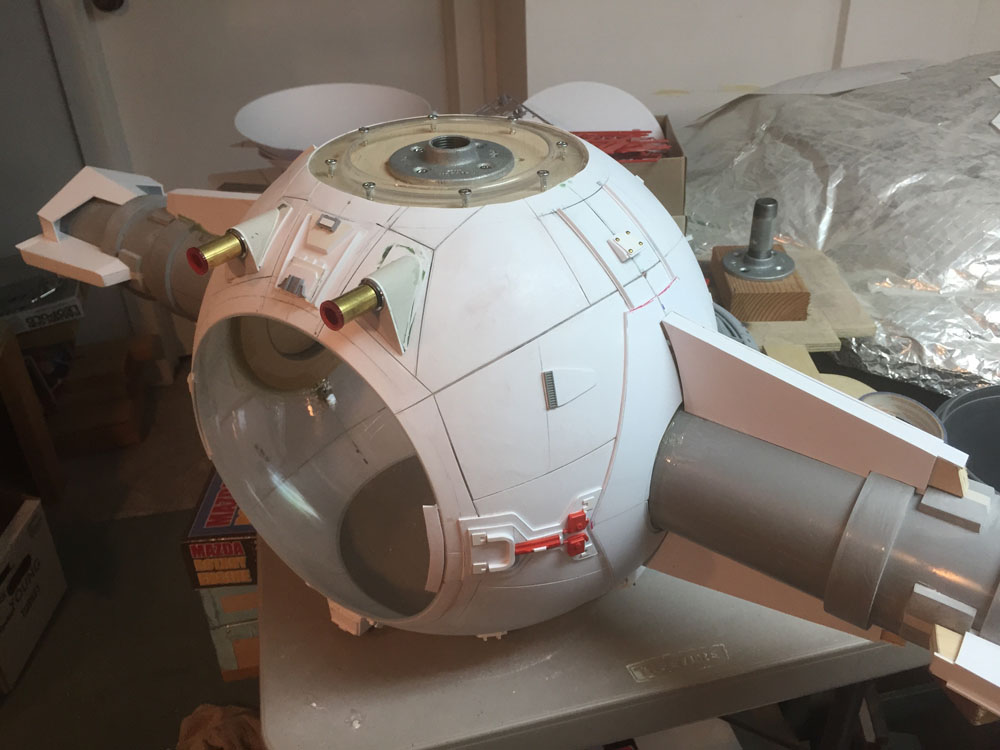
As the details on this model are so specific I wasn’t able to use many kit pieces. The only ones on the exterior are seen here in red.
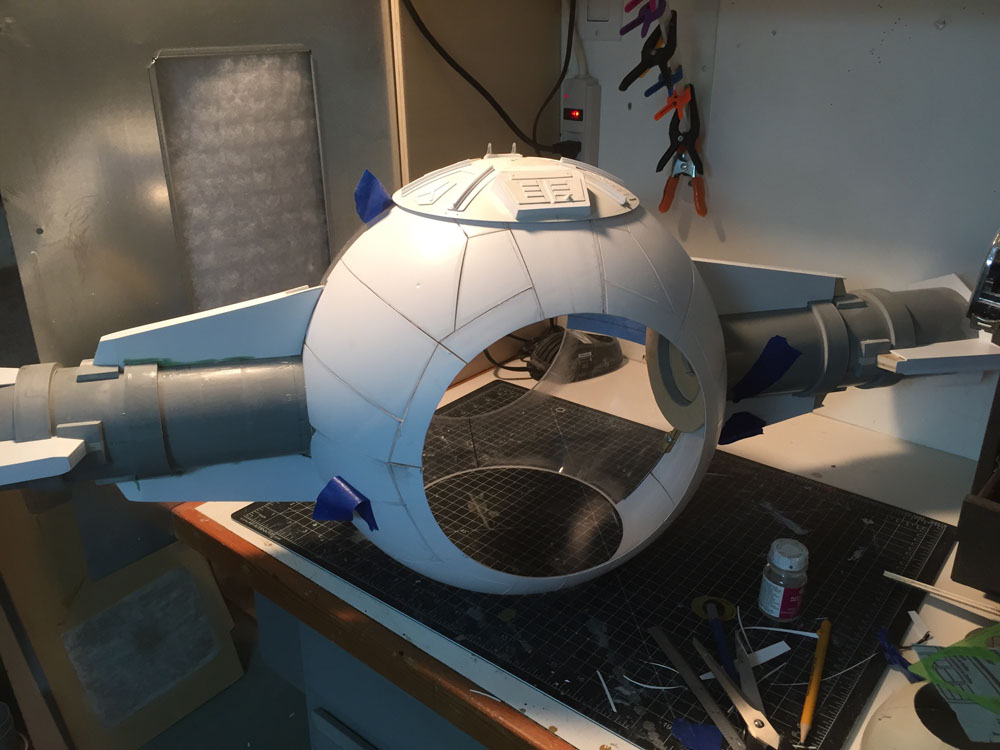
Applying the last exterior details.
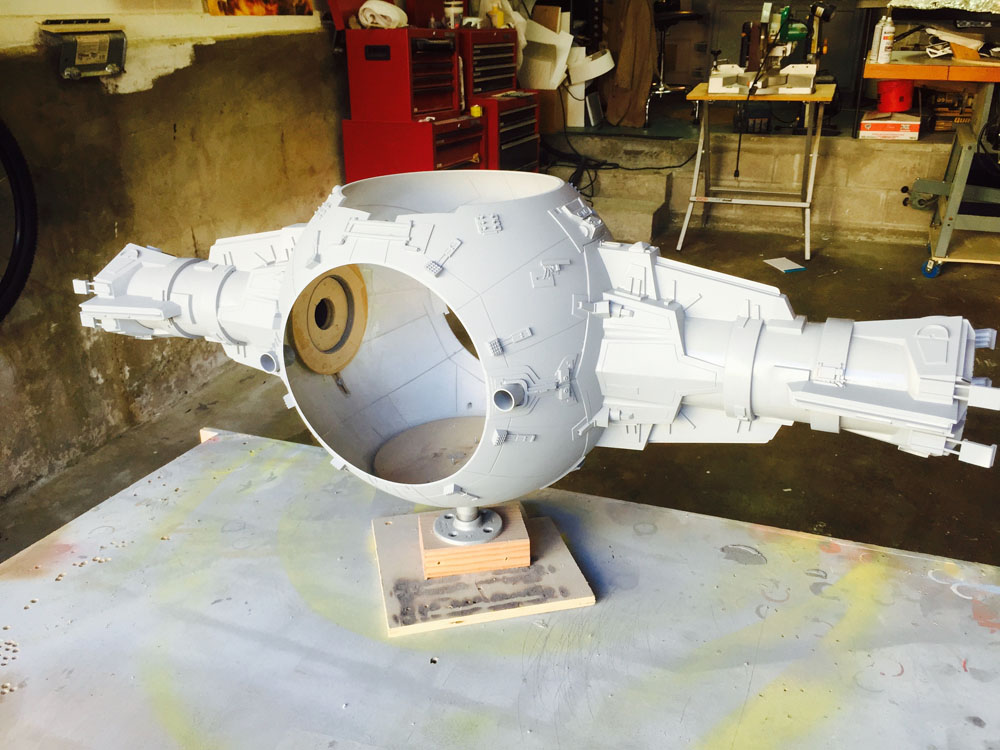
The first coat of primer
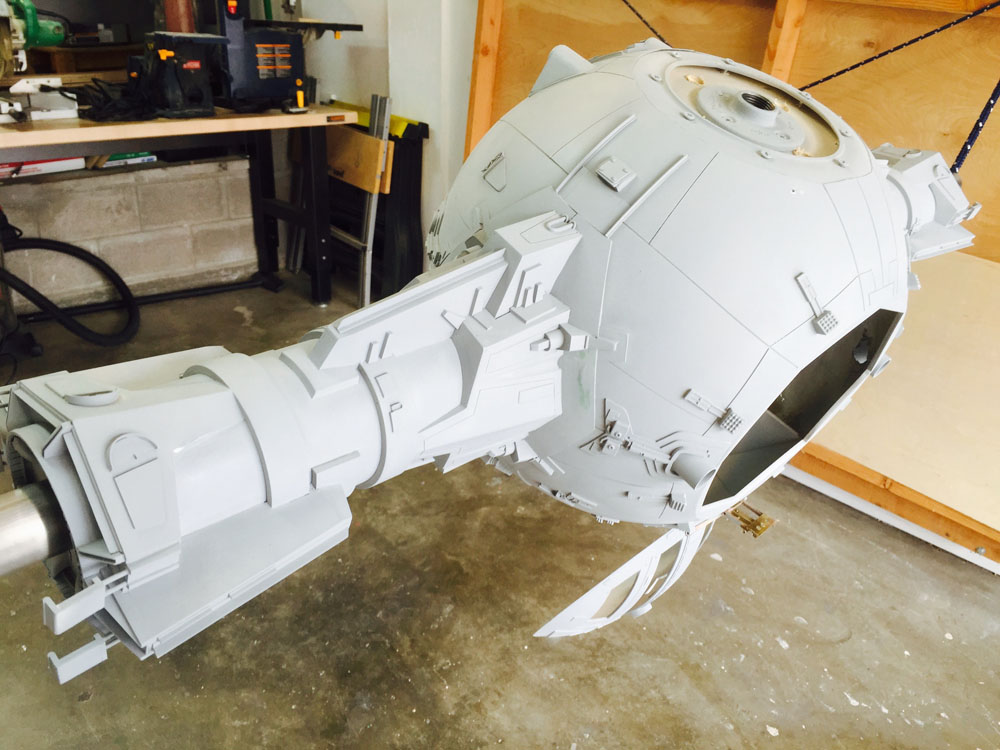
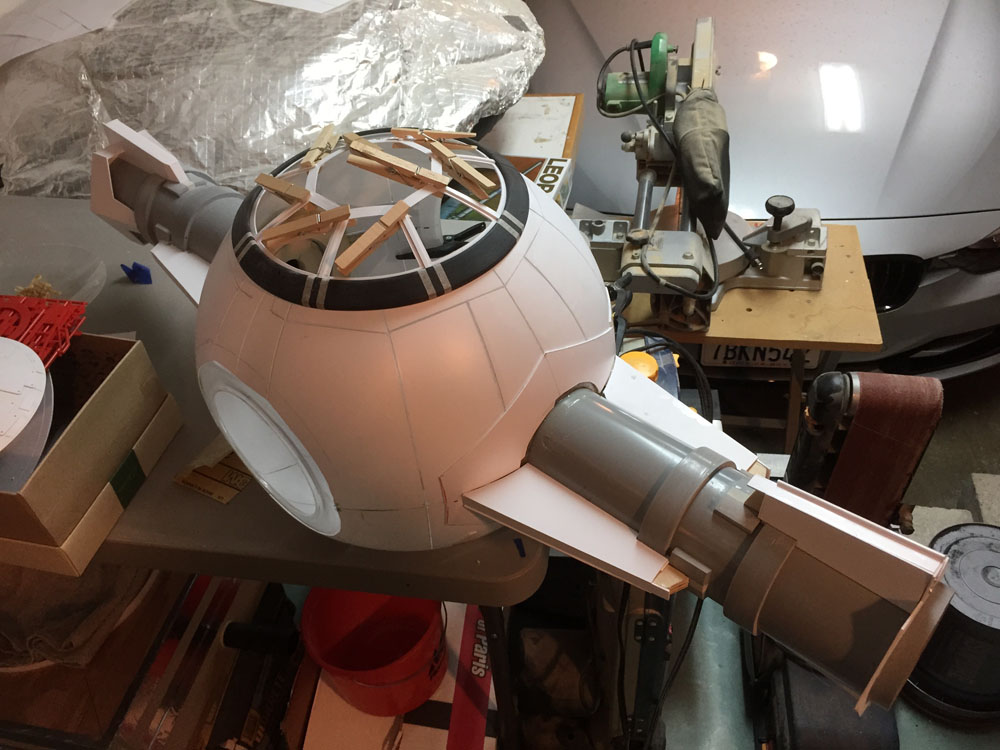
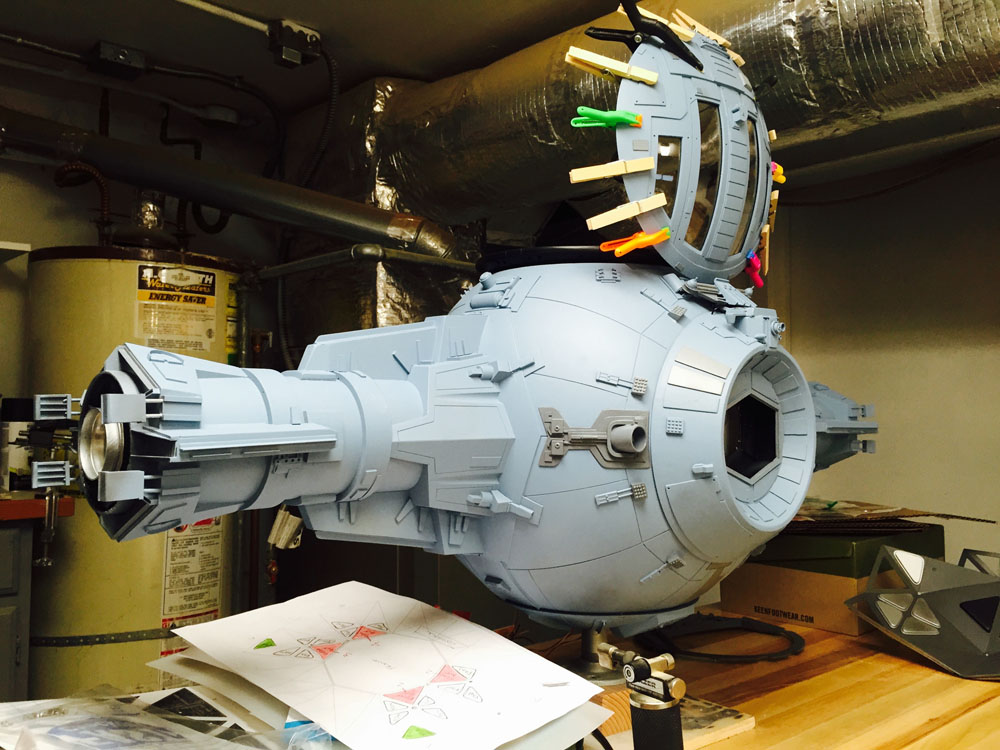
Hanging the model made it easier to paint.
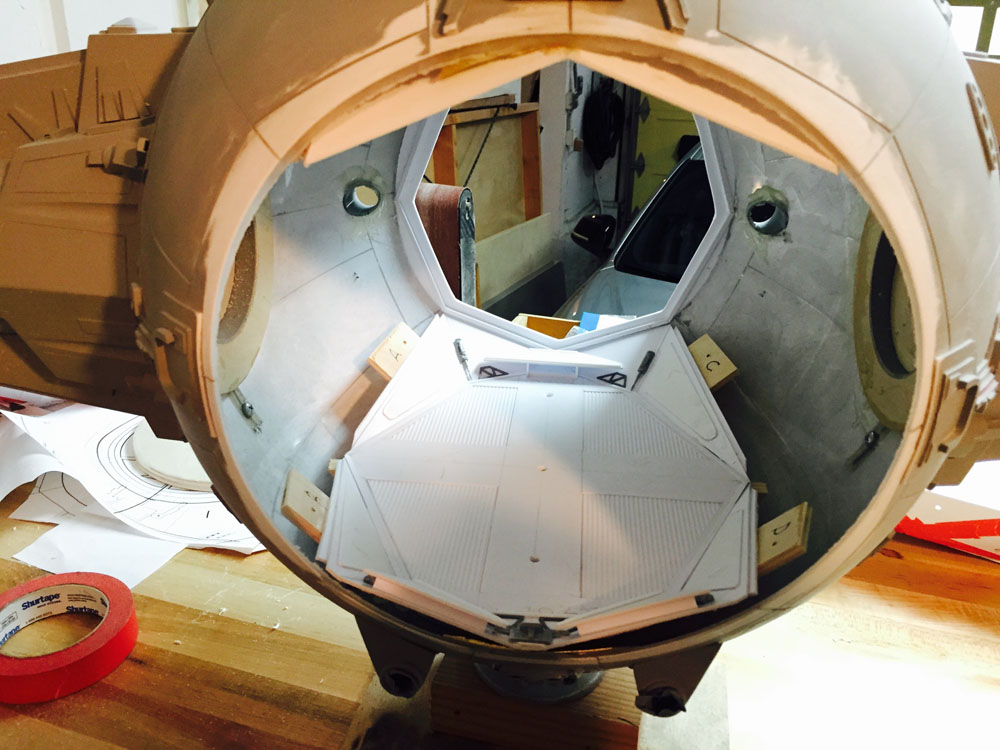
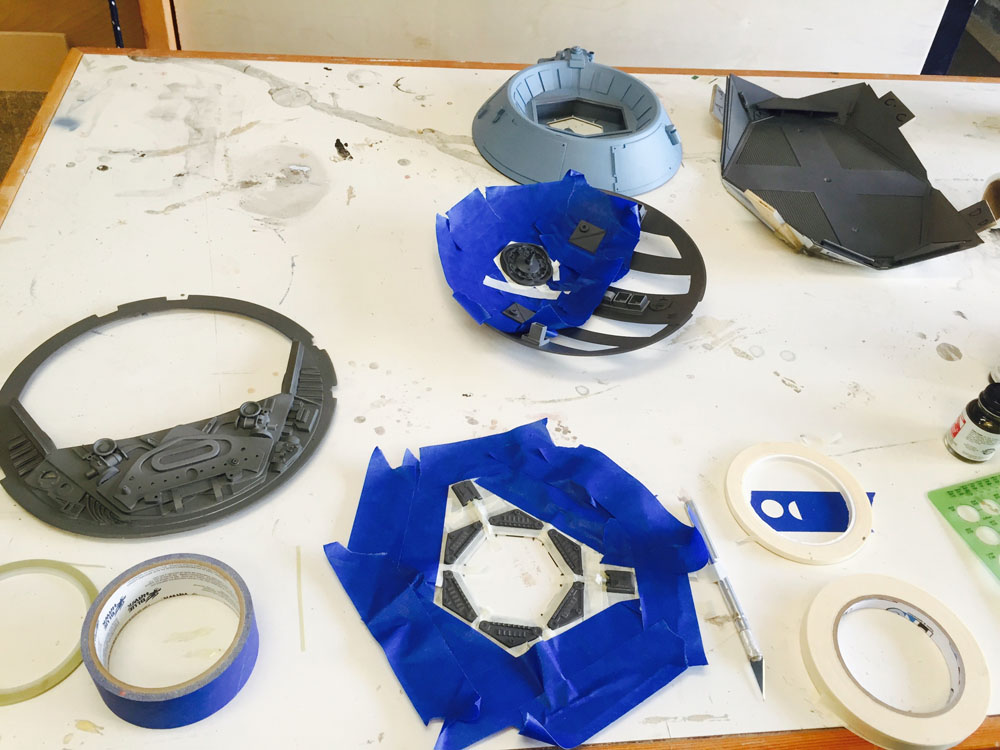
The first piece of the interior “puzzle”, the floor.
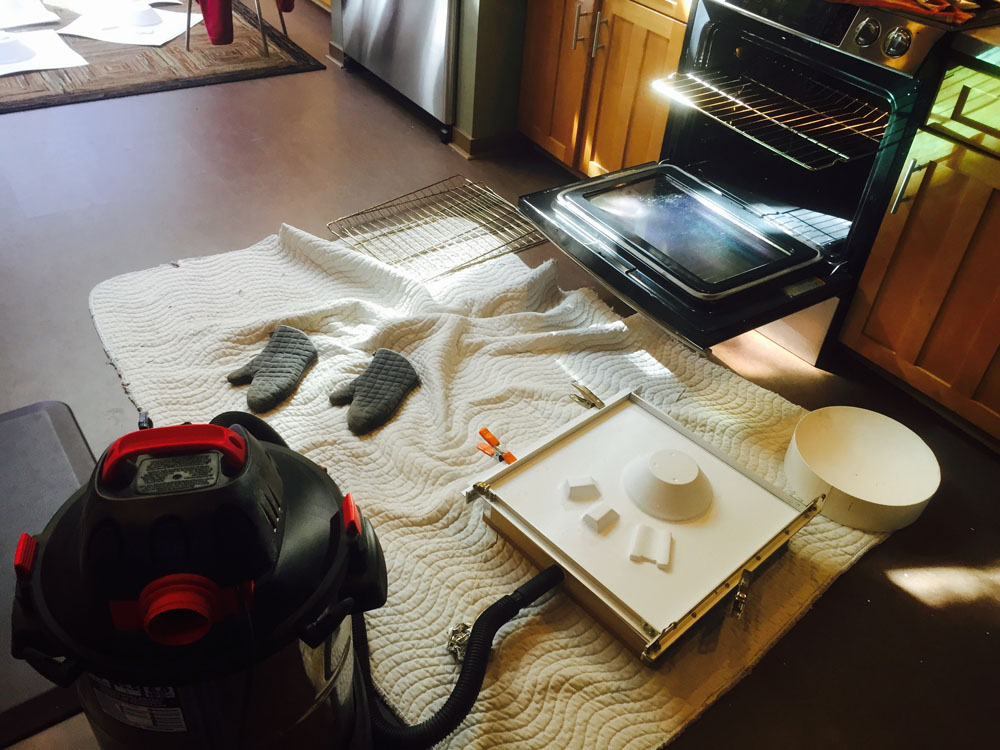
Vac-u-forming the pulls for the back hatch and the pilot chair.
On the right is the plaster mold of the acrylic sphere I made before cutting holes into it.
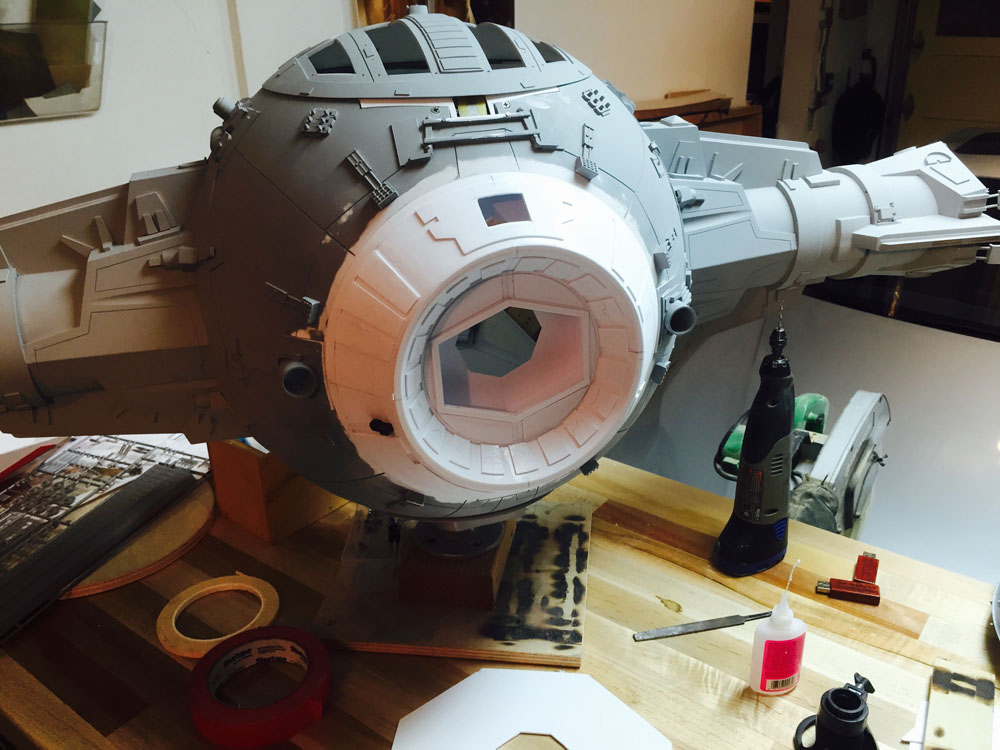
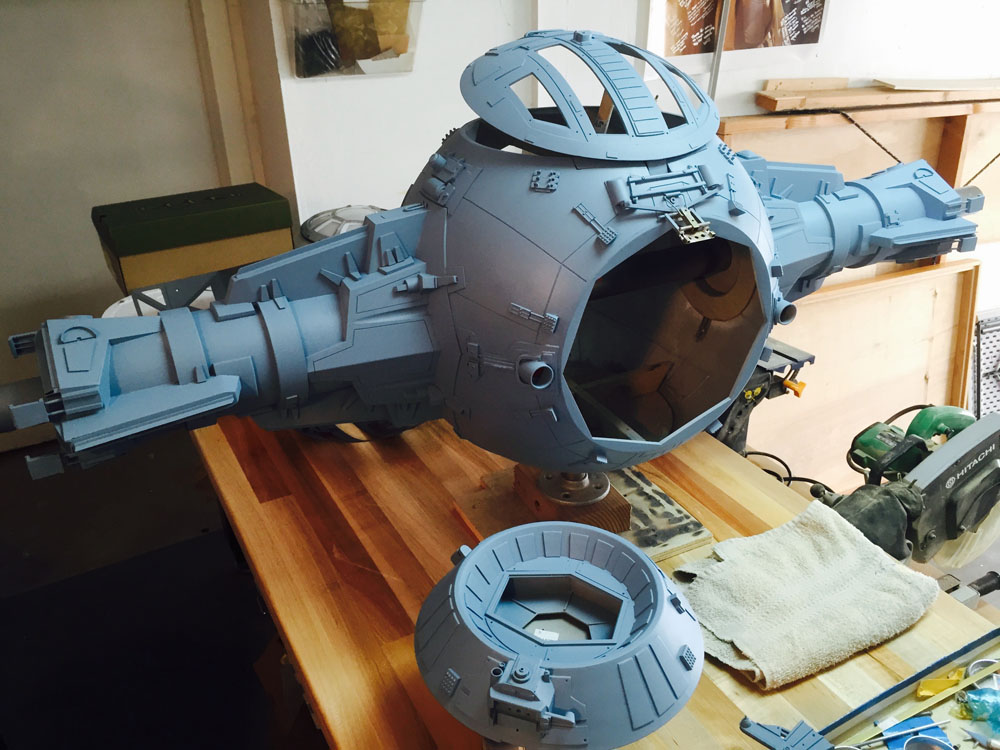
Fitting the detailed hatch to the body of the model. In the film, it is established there is a small window on the back wall. I had to cheat
this window down to line up with the opening in the center of the back hatch.
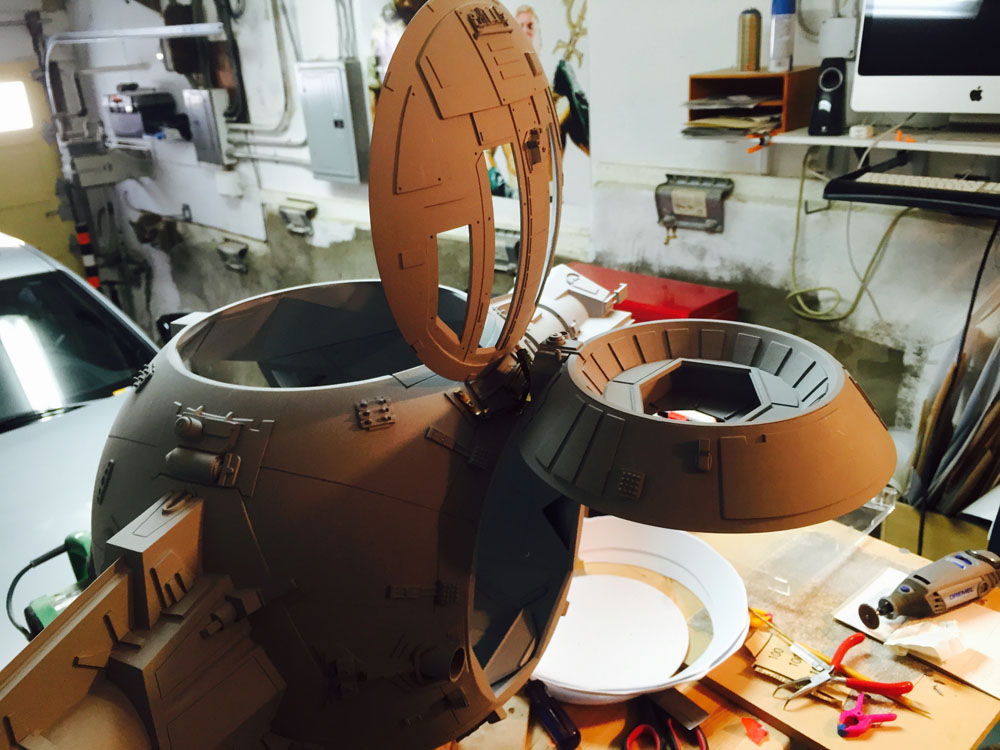
Testing the hinge for the back hatch. The greeblie details above the hinge had to pivot out of the way for it to work.
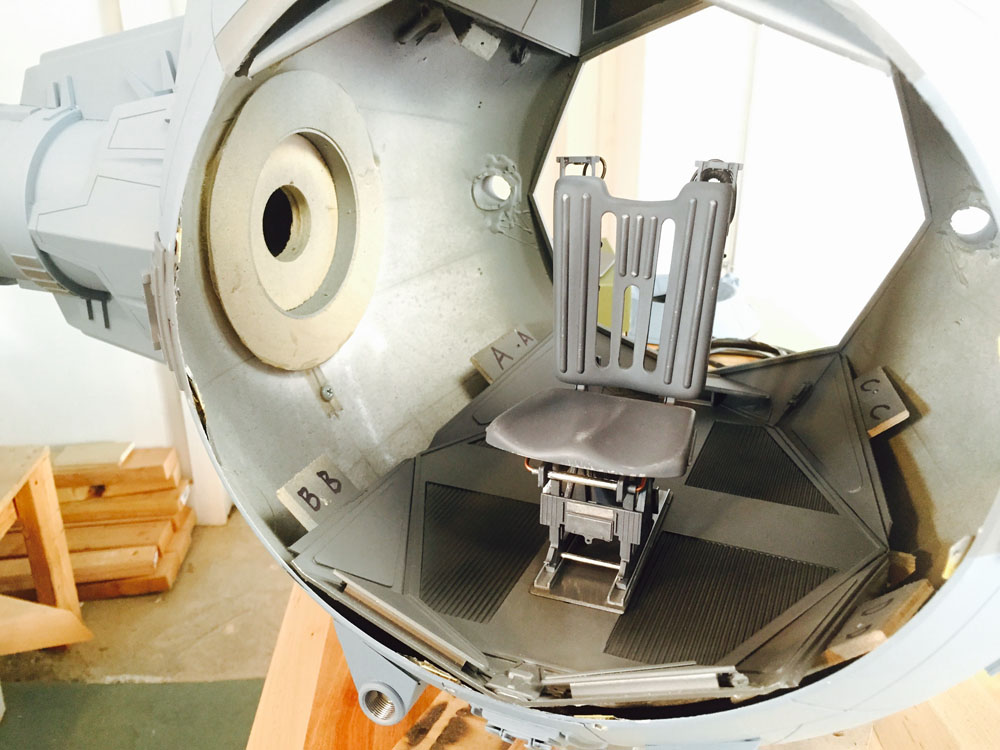
Test fit of the finished pilot chair.
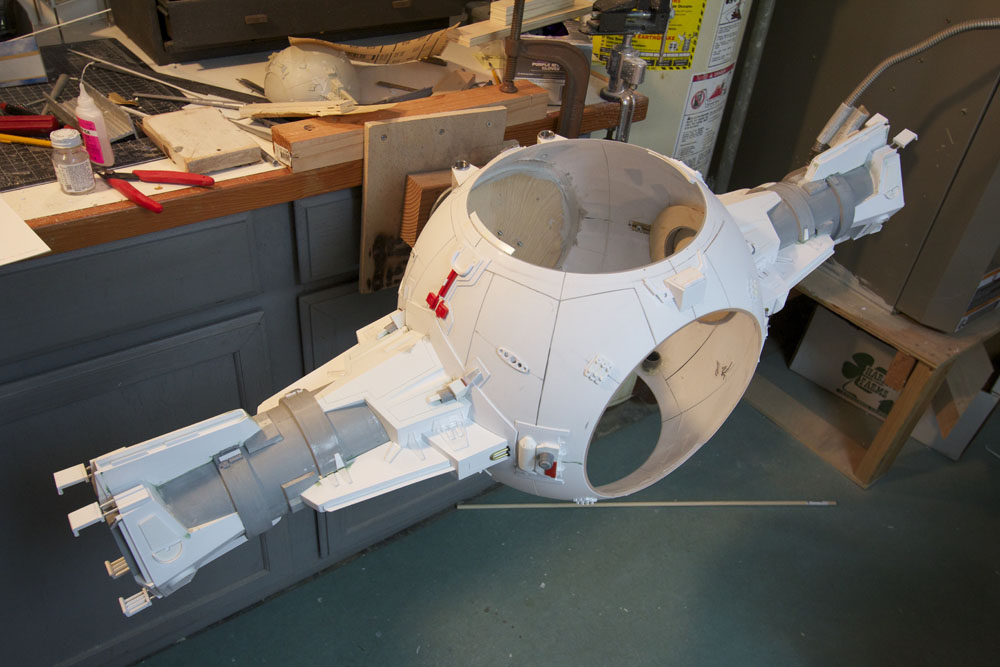
The interior side panels in place. The fourth (top) section of the interior was built into the sphere and was not removable.
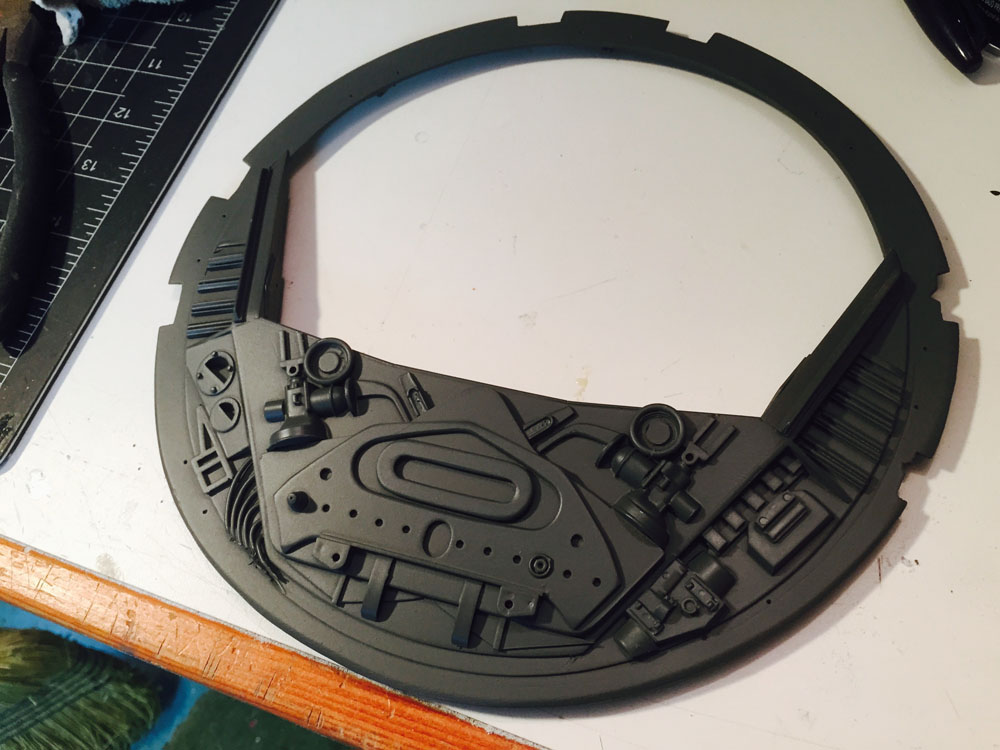
This detail piece that goes right behind the main windows was present on the miniatures but not the full sized set.
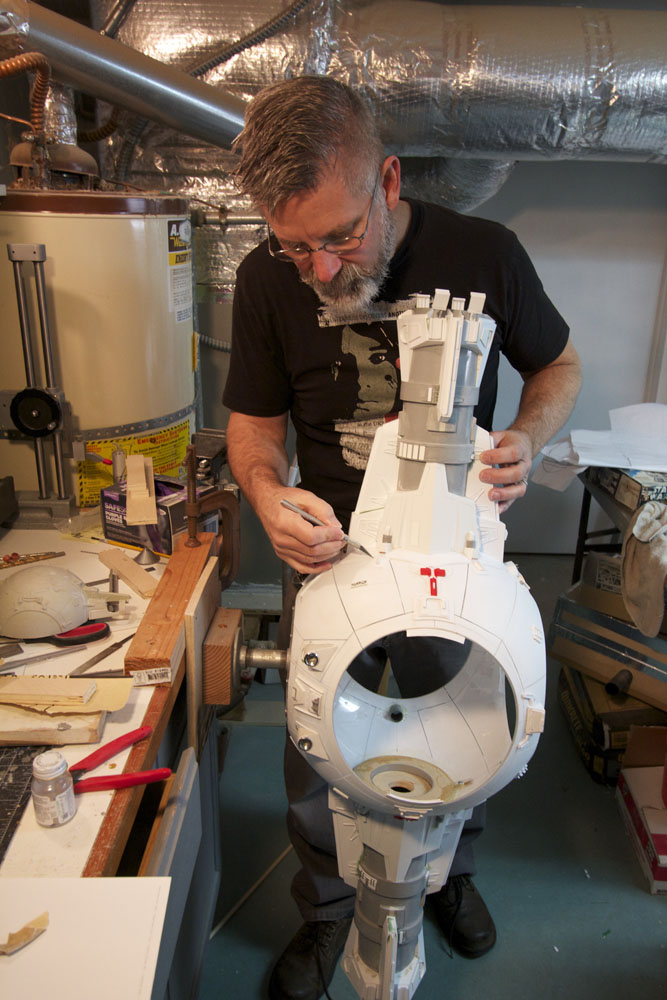
Starting the detail paint.
The base coat of “Stormy Sea”
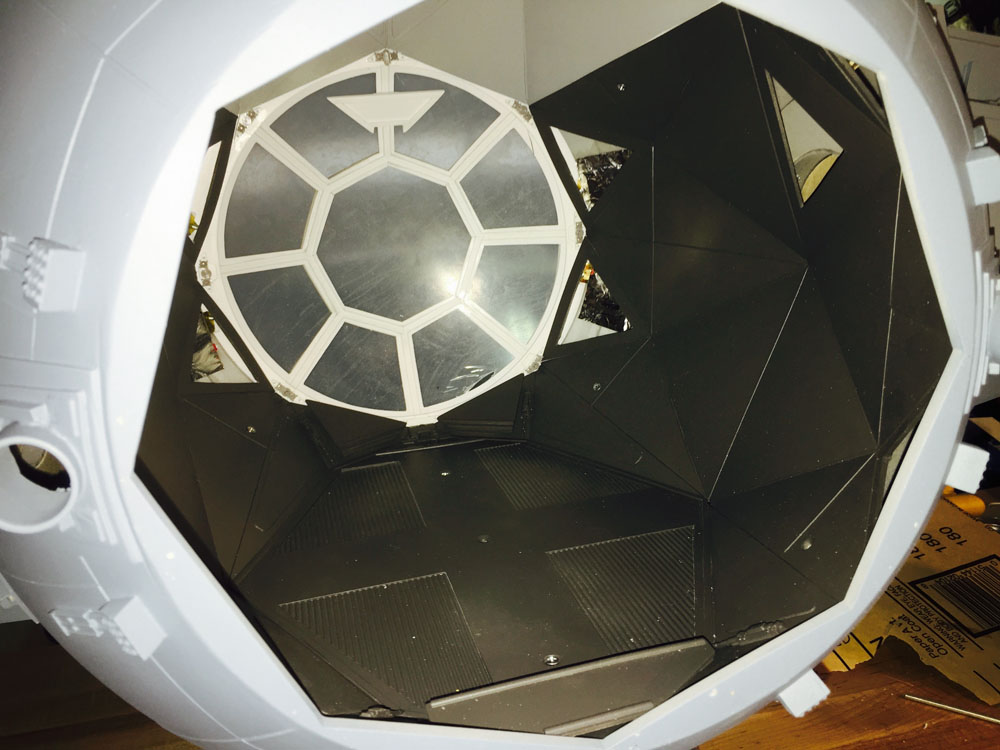
Gluing in the windows on the upper hatch. Note the diagrams and artwork for the interior panels in the foreground.
The detail paint on the exterior is very simple, just a few darker grey panels.
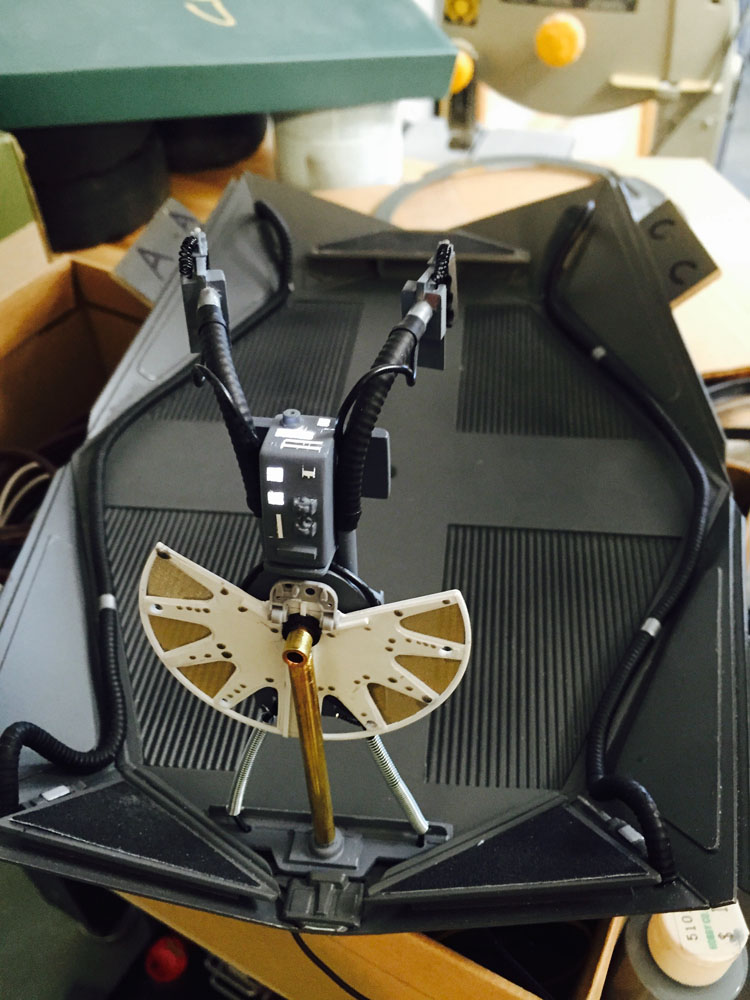
The controls under construction. The gold screen is from a coffee filter.
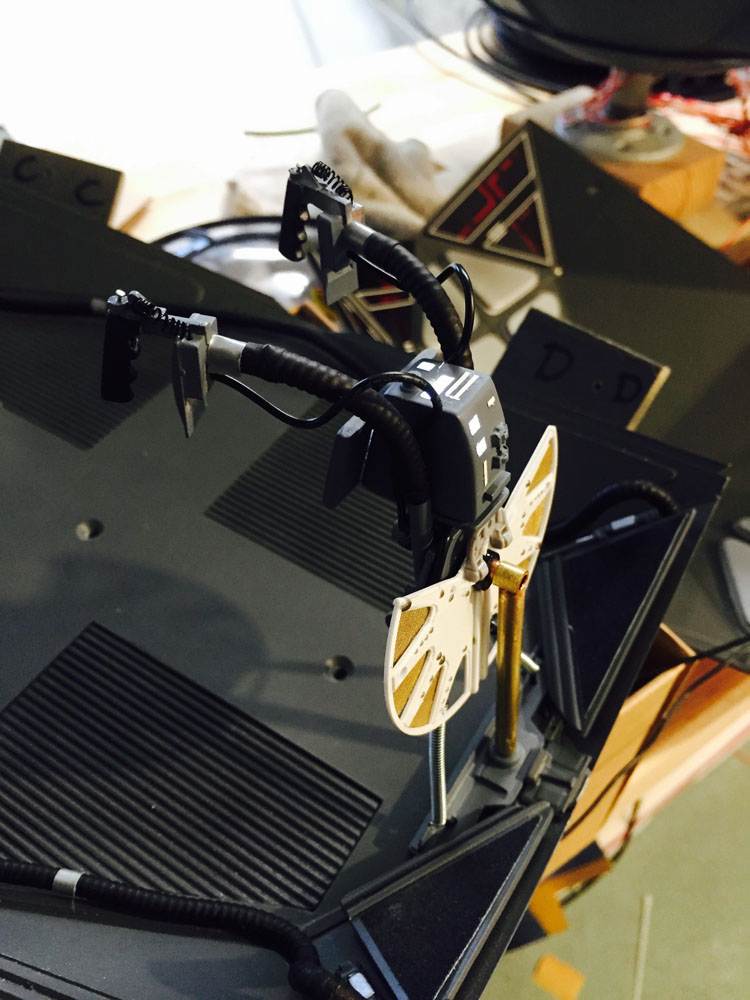
Side view of the controls.
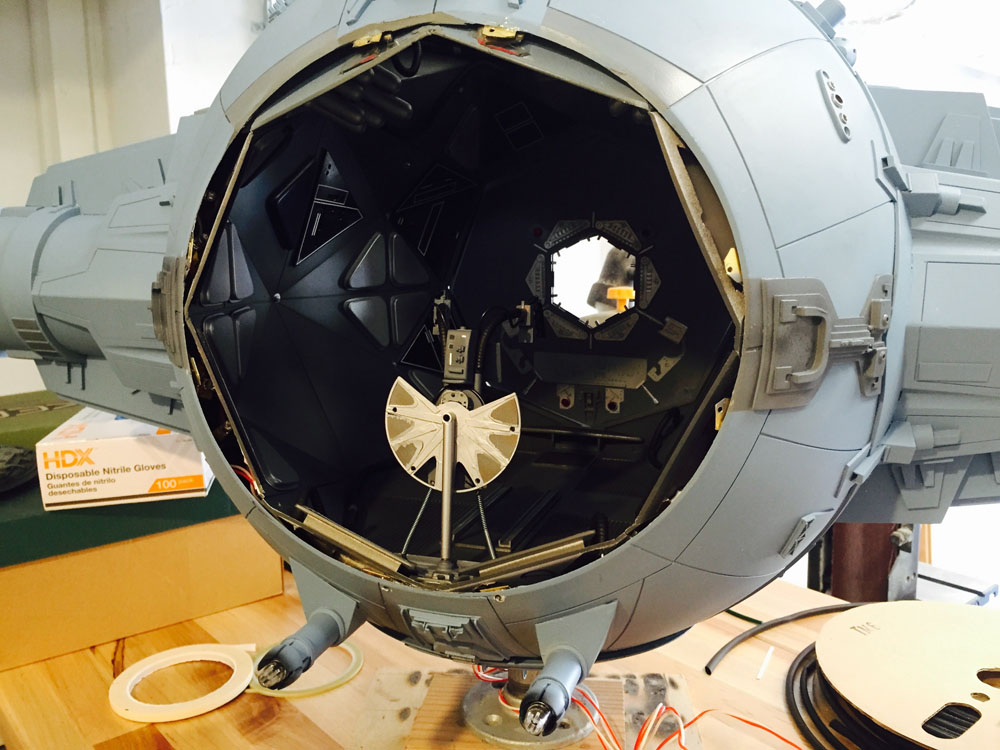
The interior nearing completion. Note the more centered position of the back window.
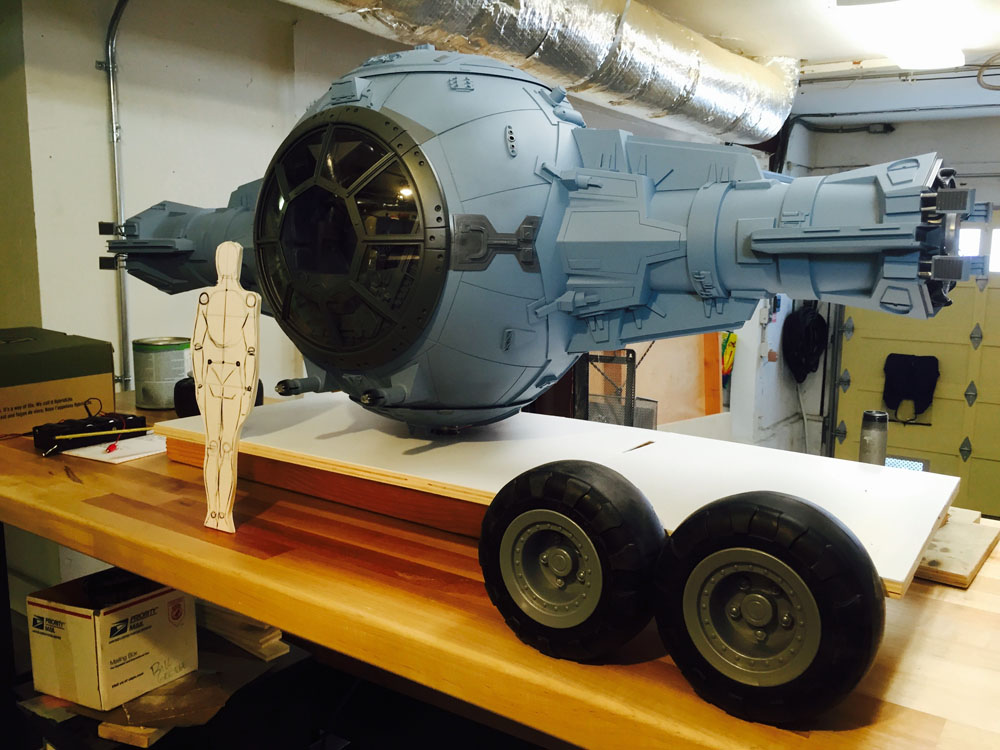
Blocking in the proportions of the trailer. The scale of the figure was based on the studio blueprint for the interior being 7 feet 6 inches
in diameter. The tires and hubs I scavenged from a toy tractor. I made some changes to the detailing on them to increase their
apparent scale.
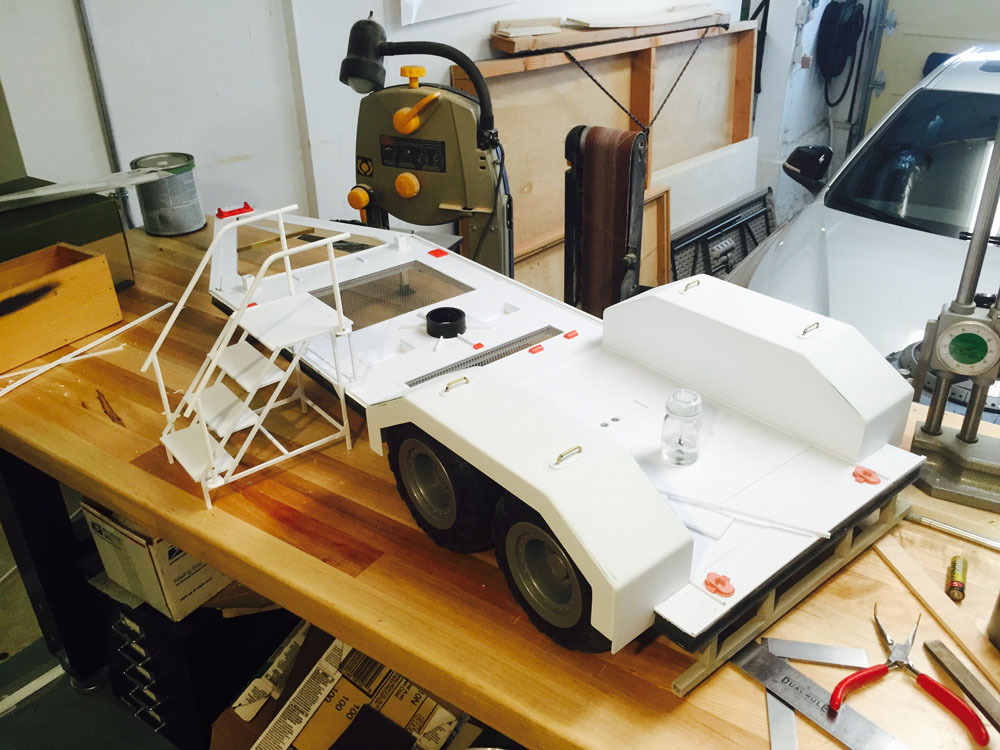
The trailer and stairs under construction. Having easily recognizable objects with the model ships gives you an indication of
its scale.
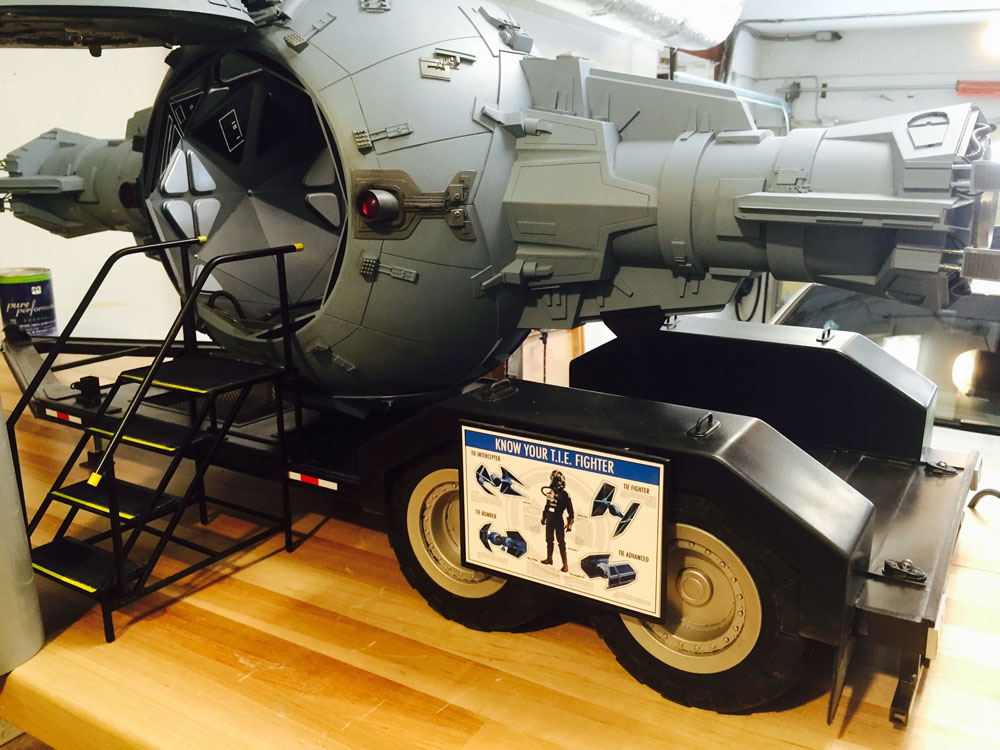
The finished trailer with the TIE cockpit. I used very a subtle graphite weathering on the model to help give it some scale but not
make it look dirty.
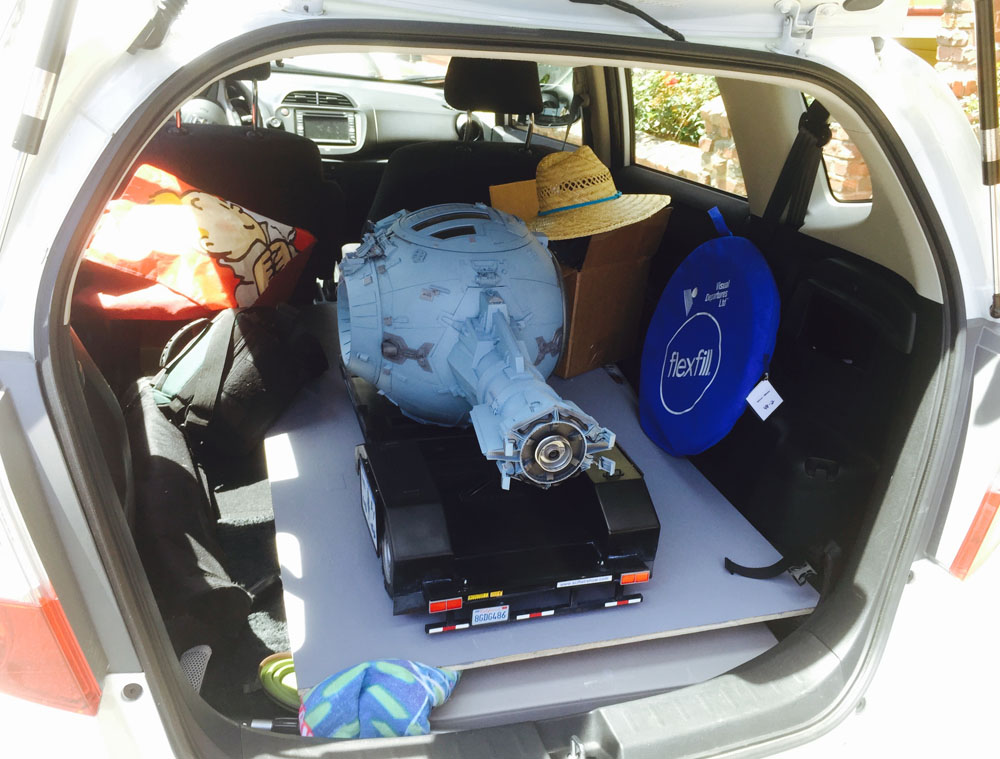
The model and my photo equipment loaded into the car. Off to the beach!
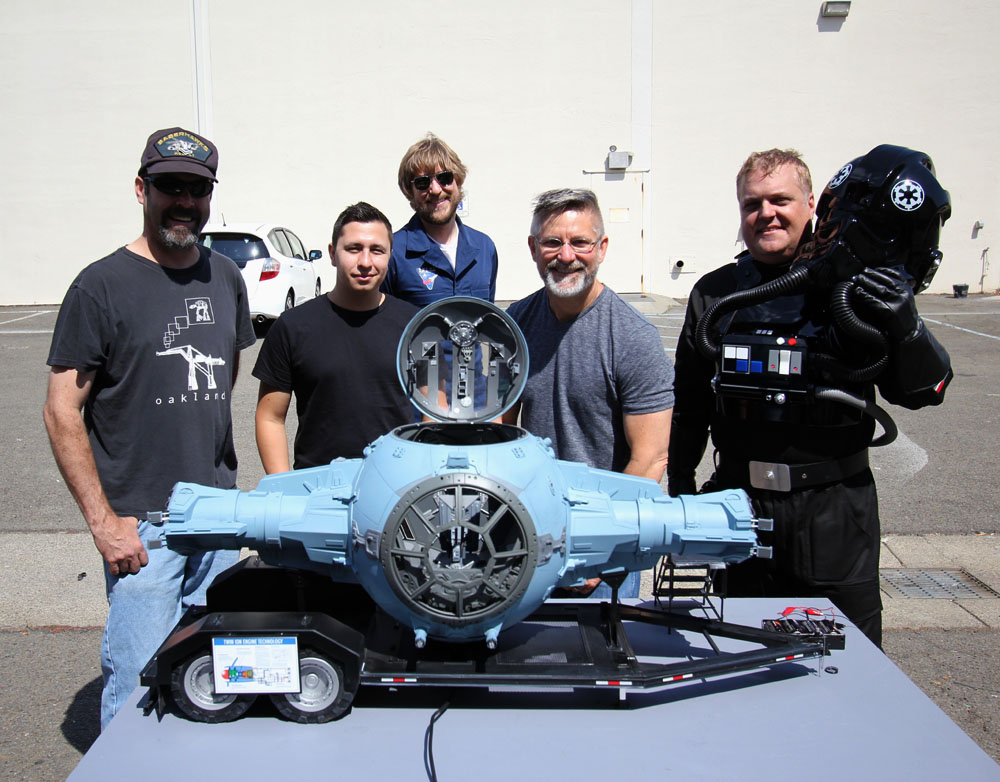
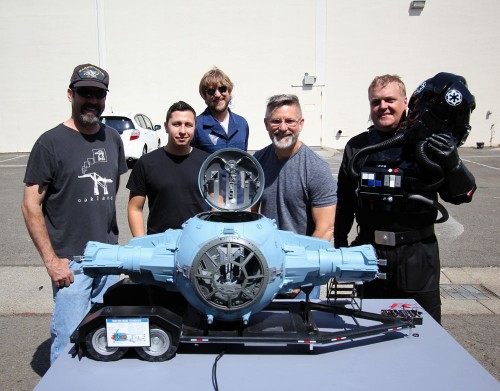
The crew from the TIE pilot shoot.
I shoot at the beach as there is a nice flat horizon (at least for San Francisco) The model is placed on a piece of 1/2 inch birch ply
painted great that provides a clean surface to later extract the model’s shadows.
This is a before/after of the original shot taken at the beach on the top and the final photoshop composite at the bottom.

To visit the Sci Fi Air Museum site direct, please click the banner link above.
Bill George
*****************************
*****************************
Statements made, or views expressed may NOT be the views of Modeler’s Miniatures & Magic
Pricing and Availability are subject to change by the Kit Maker/Vendor or Artist at any time. Modeler Magic is not responsible for maintaining the prices in accordance to the changes made by the Kit Maker/Vendor or Artist.
Professional Customer Service and Quality Control are the responsibility of the Kit Maker/Vendor or Artist selling the item of which Modeler Magic is only showing for them.
Modeler’s Miniatures and Magic has no professional or monetary affiliation with any kit makers, vendors or artists shown on this site other than showing the works and offerings those Artists, Kit Makers and Vendors wish to show on Modeler Magic in their own names. Modeler Magic promotes the art form in this way. Modeler’s Miniatures and Magic claims no trade marks or copyrights on anything shown on it’s site other than it’s own created artwork presented. Modeler Magic reserves the right to remove any material shown at any time from anyone, and we will follow all legal aspects of the art form as they are presented to us by the proven legal owners of the above stated materials and/or their court appointed representatives.
****************************************