
Once again I have the great pleasure of introducing another fine talent to this gallery… Nicholas Sagan! This amazing build is from one of the worst Star Wars kits AMT/Ertl created… the Star Destroyer! While a brilliant design in the Star Wars films, the original kit release was not at all what the Star Destroyer was in the film… and what I consider to be very challenged in it’s shape and accuracy. Nicholas obviously changed all of that in his fantastic creation here! I look forward to showing more of this artists works!
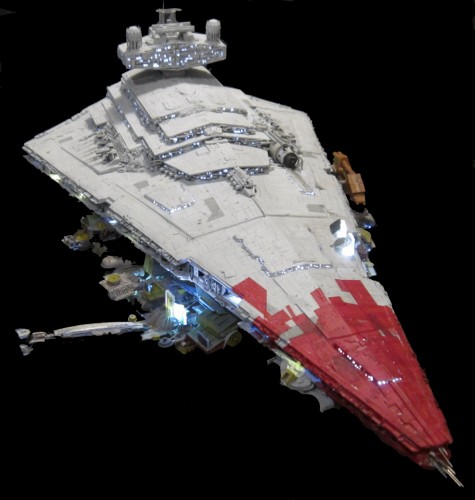
The Errant Venture started off as an Imperial-II Star Destroyer that was captured by the smuggler Booster Terrik (who later became father-in-law to renowned Jedi Master Corran Horn). The ship went through many phases of retro-fitting and repair, including but not limited to redesign of internal deck and hangar layouts to accommodate smuggler traffic, additional hidden (and not so hidden) weaponry, extensive communications and sensor arrays and most notably, a coat of distinguishing red paint provided by smuggler Talon Karrde.
During it’s many years of service on the periphery of the New Republic and Galactic Alliance, the Errant Venture has served as a Shadowport, Mobile Command Center, Jedi Praxis and Safehouse, Super Weapon, Casino and has proven itself to be indispensible as a vessel to fit any special niche.
Ingredients for those who want to do something similar:
1x AMT/Ertl 1/4222 Star Destroyer
1x AMP Bridge/Spine & Turret Bay Upgrade
1x set of Hackcore Drive Yards Venator Engine Nozzles (lg & sm)
over 1000 feet of .25mm fiber optics
home made decal scribing guide designed from studio model patterns
home made paneling and billboard decals
self-designed & 3D printed Deflector Dome upgrades
brass rod for ventral pod supports
8x warm white chip LEDs
16x cool white chip LEDs
7x blue LEDs
12x white LEDs
3mm headphone jack & plug
.005″ self-adhesive vinyl stickers
a TON of various styrene strips and sheets
a TON of various bits of photo-etched parts
a TON of various armor, air, ship and other random greeblies
a fine point, hard lead pencil
6″ dual hinge Panavise CC camera mount
wooden base
small mirror
Process:
This started off by sanding down all the details on the original kit parts to a smooth surface. From there all the scribing guide decals were added and the long process of scribing commenced. The kit trenches were a little too tall so I remade the walls at 7mm high and placed them at the inside lip on the kit part. That way, once the panels were scribed I dug through my bins and bins of greeblies and added them to the bare vertical surfaces. Every step of the way was informed by the Avenger studio model. I also used self-adhesive vinyl stickers to replicate much of the small paneling seen on the Avenger.
For the AMP bridge parts I cut the tower face off in order to hollow it and the neck/spine structures. The parts themselves were correct in terms of proportions but more detail was necessary. Sadly, the AMP set I received did not have the deflector domes so I built up studio-accurate 3D versions and had a set printed. They still needed the supports and static discharge vanes so those were created with .02″ strip styrene and fiber optics.
Speaking of fiber optics, there is nearly 1000′ of .25mm fiber optics threaded into the Errant Venture. The positioning is as approximate to the 8ft studio version as possible, but I think I found a nice balance between window density and scale. There are also 8 chip LEDs illuminating sections of the trenches. Fibers were also run into the smuggler pods on the port and starboard ventral edges, which were built using a lot of various blocks and bits from the greeblie bins.
Other additions to this build were a pen housing plus greeblies to re-create the famed Darksaber super weapon, a ping pong ball cut in half and applied to the ventral hull to make the Gravatic Amplitude Modulator, a set of engine nozzle upgrades courtesy of Stefan Hacker, some extra hangars of various sizes along the side trenches and in the ventral hull, a couple of Battlestar turrets to replace missing kit parts, and home made billboard decals placed in strategic locations around the hull and smuggler pods.
I painted the whole ship by first preshading the larger hull sections and the trenches. The base coat is a 70/30 mix of gloss white and light gray, which left a nice bit of glossy finish which I masked off before adding the flat coat. The red nose is created mostly with decals with the addition of some red paint to touch to fill in some of the areas the decals couldn’t wrap around. Once the flat coat was down I went over every bit of the hull with a sharp pencil and a straight edge to mimic the studio model paneling technique.
2 months and a great deal of nightly sacrifices kept this project going. Also, I would like to make a special point and thank the modeling communities not only here on Scale Model Addict, but on the Starship Modeler and Phoxim.de forums as well for their generous encouragement. Without the positive feedback and general enthusiasm for this project it could have very easy joined others in the unfinished corner of shame.
Happy modeling!
To see the complete progress of the build, please visit https://nicholassagan.wordpress.com/?s=Errant
Nicholas Sagan


To visit Nicholas Sagan’s site direct, please click the banner link above.
To contact Nicholas Sagan direct, please click the CONTACT ARTIST link below.

Nicholas Sagan