
Built from the AMT Millennium Falcon Kit, artist Gábor Takacs has chosen this fantastic build to be his first shown here on the Gallery site. The AMT has been known to be a ‘challenged’ kit when it comes to accuracy of the Falcon we viewed in the Star Wars Saga, and yet we can see by Gábor’s build and paint of it, not to mention his amazing lighting added, that the beast can truly be made to look fantastic!
This kit reminds me of when I was a young man. I still remember getting my first MPC kit of this when it was first released. I hurried to build it in order to play with it, making a glue-globbed mess! LOL… Then I hung it two feet above my bed so I could star at it all the time! This piece surely is not like the mess I did… as Gábor is clearly an amazing artist. I am looking forward to showing more of this artist’s works!

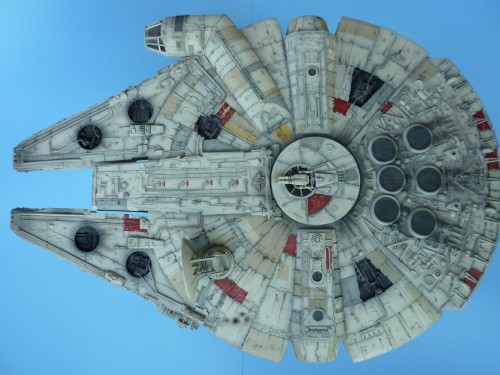
Falcon detailing and lighting
I should not introduce a old AMT Falcon kit for most of the sci-fi modellers, neither to describe that there are several different types in Star Wars thrilogy. AMT kit based on episode IV.New hope, but I wanted to improve it to episode no.VI.Return of the Jedi. I wanted to build the Fine Molds Falcon, but my purse and the dark side dissuaded me….Next one will be the Falcon to save a large amount of timeJ
I started the modification on the cockpit. I made the door about styrene sheet, switches made of spare parts of 1/72 aircraft/helicopter sidepanels, photo-etches. I drilled 25-30 holes and glued optical-fibers (be aware, if you bend them, they may loose their ability to transmit the light. I added a Christmas-flashing device to get a red-yellow-blue random flash….
Chewbacca got a shoulder-belt, Han Solo got a new 1/72 upper body and head with a positure of thinking. He wonders if Leila knows how much credit does his boyfriend lost in last week on Sabbac-game…..
Cockpit is ready, let’s start the Falcon body.
Main changes on body: Sidewall height reduced to 1.4 at front, and 1.6 at rear part and added some details. I had scratch-built the 2 large cam ont he root of cockpit and simeetrically on other side. Original model contained a Porsche shift-gear case, but I made it by styrene-stripes.
I detailed the sidewalls by followings: motorcycle parts, Apache rotor hub, rocket-launcher, Mercedes engine block, cooling grid, shift gear boxes, etc.
I closed the landing bays by styrene, also covered the side tapered cone – docking rings – by styrene shield plates. Some corners and plates bent, chipped. I replaces the hoses proceeding to maintenace holes.
Engine back covering is made of a semi-transparent plastic. Bottom light covers made by deep-drawing tecnique. There are some details added to the aisle: Apache control column, etc.
Cocpit side-venting lamelles are made by 3 fast-tie slice bonded together.
There is a long scratch at lest bottom of the hull. It is made by the following: deep-scratched by a sharped spike several times, then the edge chipped by a warm soldering device. Large holes behind the radar antenna are made by soldering device as well.
Electricity application:
The side of leds should be light-sealed to prevent transparent metal sidewall feeling so I covered some places by alu-tape.
I assembled the leds, switches, potmeters, etc a sin the picture of electrical draw. Cockpit had a different loop supplied by 2 ea 3V batteries due to the Christmas-tree unstable voltage.
Painting:
Base colour Humbrol 147, greyish blue Humbrol 146, lighter panel-grey is Humbrol 40, yellow-beige and red colours are mixed ones.
Fisrt I pre-shaded by dark grey (Humbrol 106) and re-painted by base colour. a sárga és bordó színek kevertek, a világosabb panel-szürke H 40 pale grey. Panels were weathered by airbrushing the panel edge (mith mask on) by a deeper colour, and middle remained a lighter one. Then removed masks and washed by over-thinnered art-paint and acrylic. Sompe crayons have been grinded and used for weathing as well. Oil and rust stains are made by art-paints and crayon as well.
Radial striping is made by streching a thread from the middle of the gun-tower to the edge of the hull, positioned a piece of paper adjacent it and scattered some grinded crayon (pigmnet) to the edge of the paper. After remove of paper, an ear-stick can be used to spread the powder slightly.
The maintenace-bays and engine got a slight black smoke to represent smut and some blaster-damages also paintbrushed (I use Tamiya XF-1)
Additional weathering tip: take some over-thinnered paint to a toothbrush, and sprinkle it with thumb. But avoid over-weathering! Some worns are also made by a milling device. For lacquering I used semi-gloss cote.
Base of the planet (the support base) is a lamp-cover, and I glued it into a flower stand base (cut the middle)
Gábor Takacs


