

So guys, I recently received this beautiful kit in the mail, thanks to Mister Wong as a preview. I received it a few weeks ago, but due to family issues, I’m just now getting around to typing this review, and I must say, he did a very nice job capturing the essence of the concept that this kit is based upon.
To start, when you open your box, you’ll be greeted with ten beautifully-cast pieces of resin (cast by Ed Holt, or, as some know him, MonkeyWorks) and one vacu-formed part.
You will recieve:
1x: Main body
1x: Vacu formed Canopy
1x: Pilot
1x: INstroment panel
1x: Rear Plate
2x: Blasters / guns
2x: Engine exausts
and finally 2x Aileron Type Thrust vectoring fins.
It is pertinent to know at this time that when I first received this kit, I made Al and Ed aware that there was an issue with the rear plate, so my images will reflect this. They have, however, corrected the issues for production runs, I have just not received your copy of the updated part at this time.
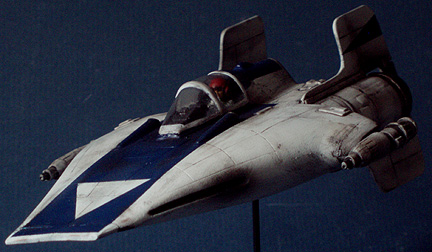
Looking at the A-wing main body, on the top side, you are graced with very simplistic, yet true-to-concept details, a few square greeblies, purposely left asymmetrical at the rear, some very nicely scribed panel lines, the cockpit tub and the top of the instrument panel and a few other various raised details. You will also notice a nicely detailed set of engine exhaust roots on either side of the rear, the symmetry on these seems to be pretty accurate. (I didn’t take a caliper to them, for those that wonder to that extent.) All the details on the rear inset of the kit are very well matched also.
Flipping this part over, your eyes behold a vertible cornucopia of well-placed greeblies (I say this tempered by the fact that the A-wing airframe is traditionally fairly smooth). These greeblies range from surface panelling, presumably extra armor over sensitive systems. You are also looking upon well-built vent work toward the rear, a nicely detailed inset section almost centered front to back; I’d like to believe these details are perhaps co2 scrubbers or maybe some form of power generator for the main weapons. You also have the pleasure of several engraved panel lines at the bottom of the craft as well that call out for a nice wash to make them pop.
From here, I will venture to the engine cones; fairly simple pieces. They are what you’d expect from a pair of engine cones on any model. Finely detailed “afterburner can” like detailing around the outer edge and internally you’ll find a set of radial strips surrounding the central outlet on each. It should be noted that there is a small raised strip on each that will correspond to a slight bump where they attach to the rear plate. You’ll want to make sure you position those accordingly during assembly.
As for the Thrust Vectoring Wings, they are very thin and fragile, so take care when handling them Warpage is possible, but as all resin builders know, this is easily fixed with some warm water. The fine details on the wings lend to a very sensible panel layout that both plays to a construction that would make sense if it were a real machine, as well as for moving parts necessary for the part to work properly if it were in flight.
On to the rear plate of the A-wing: I haven’t been able to set it into mine as of yet (I haven’t had time to modify it to fit yet), but I can tell you from looking at the structures there that when the production parts go out with the kit that have had the previously mentioned error corrected, they will look stunning on the rear of your built concept A-wing. The placement of what I think of as four micro thrusters towards the center is well-thought out, and the greeblidge isn’t so much that it detracts from the model as a whole. Again, I feel it’s worth mentioning that one should take note of the little bump on the plate for the engine exhaust can placement.
Next, we’ll look at the guns: They are simply, yet perfectly, detailed as a precursor to the studio model of the A-wing. They will compliment the kit nicely with their sculpted and radial veins around fore and aft sections. Take care when locating them in the hull on either side, as there is some fore and aft play and, as well, the rear of the blaster mount point will want to play up and down on you. I might suggest that you mount them on brass rods to allow a slight pivot to each one; you’re not attempting to capture a cannonical theme here, so have fun with it. Perhaps each gun can pivot slightly up and down independently of each other to assist with targeting, call it the “cameleon targeting system”.
The instrument panel and pilot, there isn’t much to say about them. They are just basic, well-designed to fit the cockpit tub of the A-wing. The instrument panel is simple, yet functional, with a spot that could be a targeting screen, a radar, and some small cluster of gauges to the lower left side. The pilot (I’m not sure of the base used) puts me in the mood of a helo pilot; it has been modified to match well with the Star Wars Universe.
The vacu-formed canopy is what we have all come to expect from these. Nice, clear and well-detailed with a canopy frame, ready-to-paint and set in place either open or closed.
All-in-all, to the design of the kit, I think it is beautiful, well worth the $60 asking price. The only thing I can really say that isn’t positive about this kit is that the center line is off on it by about 0.05″, but again, as I’ve stated earlier, this is a non cannonical subject so who is to say that the cockpit tub is built off-center for some technical or tactical reason. Maybe it was built off-center so it wasn’t above the reactor in case of a catastrophic hit on the hull. The pilot would have a few crucial seconds to eject. Maybe it was for tactical reasons; making it harder for the cockpit to be targeted. Use your imagination and this kit can become a beautiful addition to your Star Wars display.
For the casting, Ed did a wonderful job on this kit. The seam lines are well placed on areas that would be easy to clean. All of the pour stubs and vent holes are well-hidden, with the exception of one on the very front of the A-wing body; this one will perhaps be a bit of a hassle to clean, but only due to the thinness of the area in question. I mentioned this to Ed as well and he said he might try to modify that part of the mold. Nonetheless, any builder should be able to take care of it with relative ease.
All in all, I give this kit a solid two-thumbs up review. With the proper time and patience, as I stated previously, you will have a very nice addition to your squadron.
View more photos of the kit by clicking the link below
George Waldron
To contact the KIT PRODUCER direct, please click the CONTACT KIT PRODUCER link below.


